














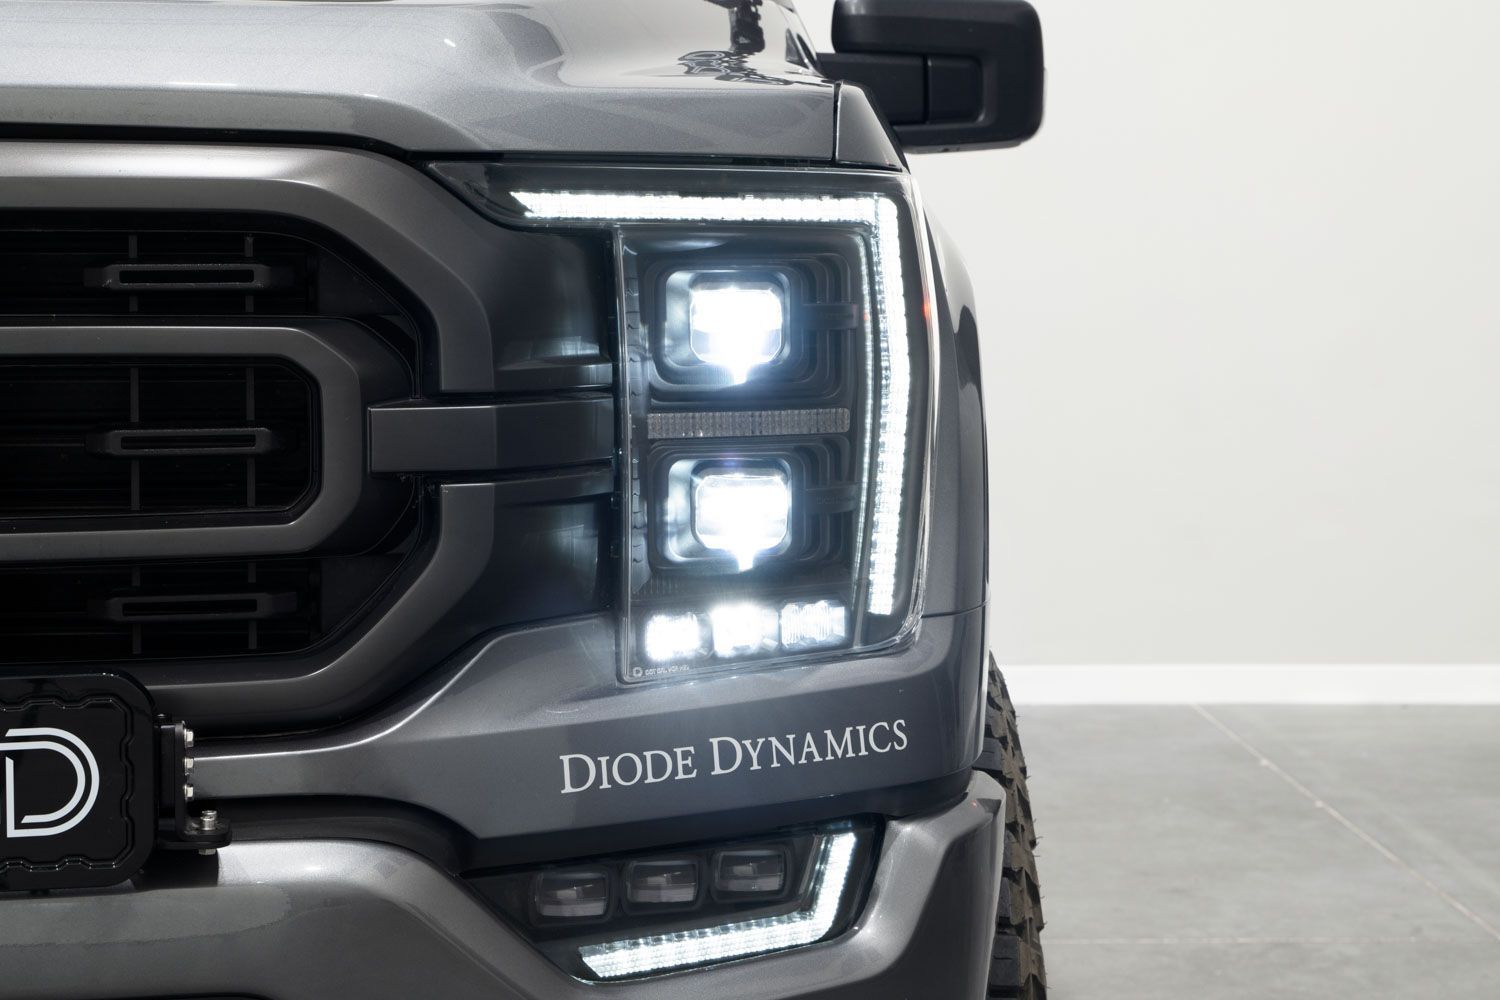
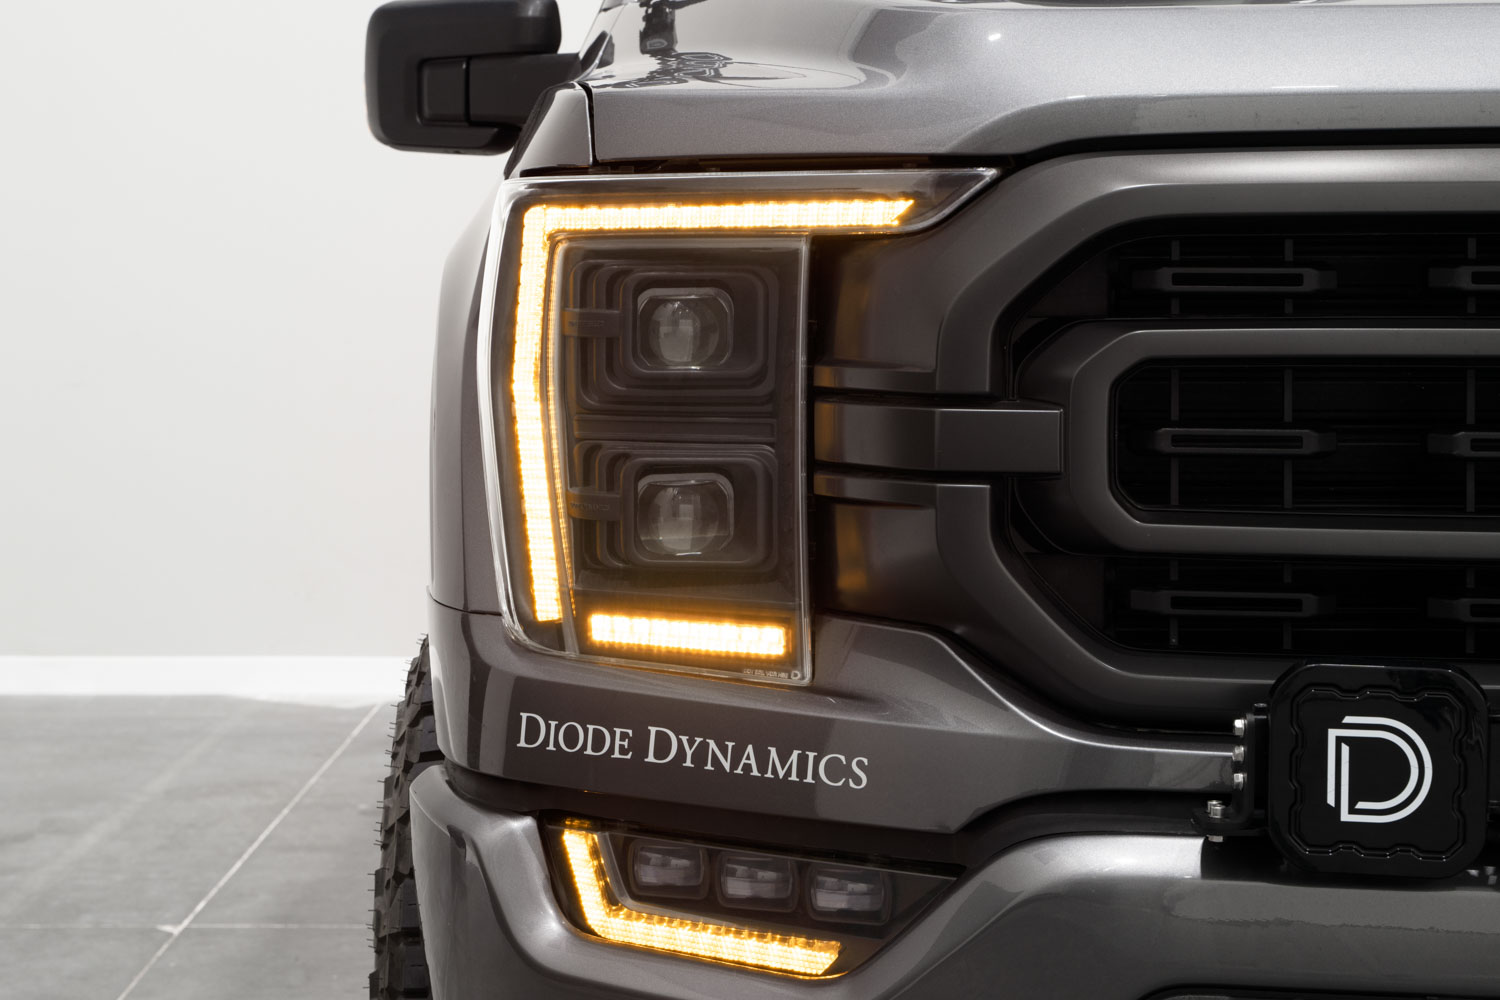
Elite LED Headlights for the 2021-2023 Ford F-150 were designed to deliver ultimate performance. With the latest technology and features, they add modern style and functionality to your F-150! Each headlight features Bi-LED projectors for maximum output and intensity, a switchback sequential turn signal, a welcome sequence, and a premium DRL bar with selectable color! The Elite Max offers additional show mode and off-road lighting features. Elite Headlights redefine what's possible for aftermarket Ford F-150 headlights!
The following installation guide will provide detailed instructions on how to install Elite LED Headlights on 2021-2023 Ford F-150s equipped with factory-installed halogen or LED reflector style headlights. This guide does not apply to models featuring factory LED projector headlights. Continue reading for step-by-step instructions below!
Note: You will need to aim the headlights during this installation. It is recommended that you position your F-150 on a level surface 23 feet away from a wall (measured from the wall to the outer lens of the headlight) before beginning the installation.
Table of Contents
Installation Tools
- Ratchet
- 4mm Socket
- 7mm Socket
- 8mm Socket
- 10mm Socket
- 13mm Socket
- 21mm Socket
- T30 Torx Driver
- Pliers
- Plastic Trim Removal Tools
- Tape
What's Included
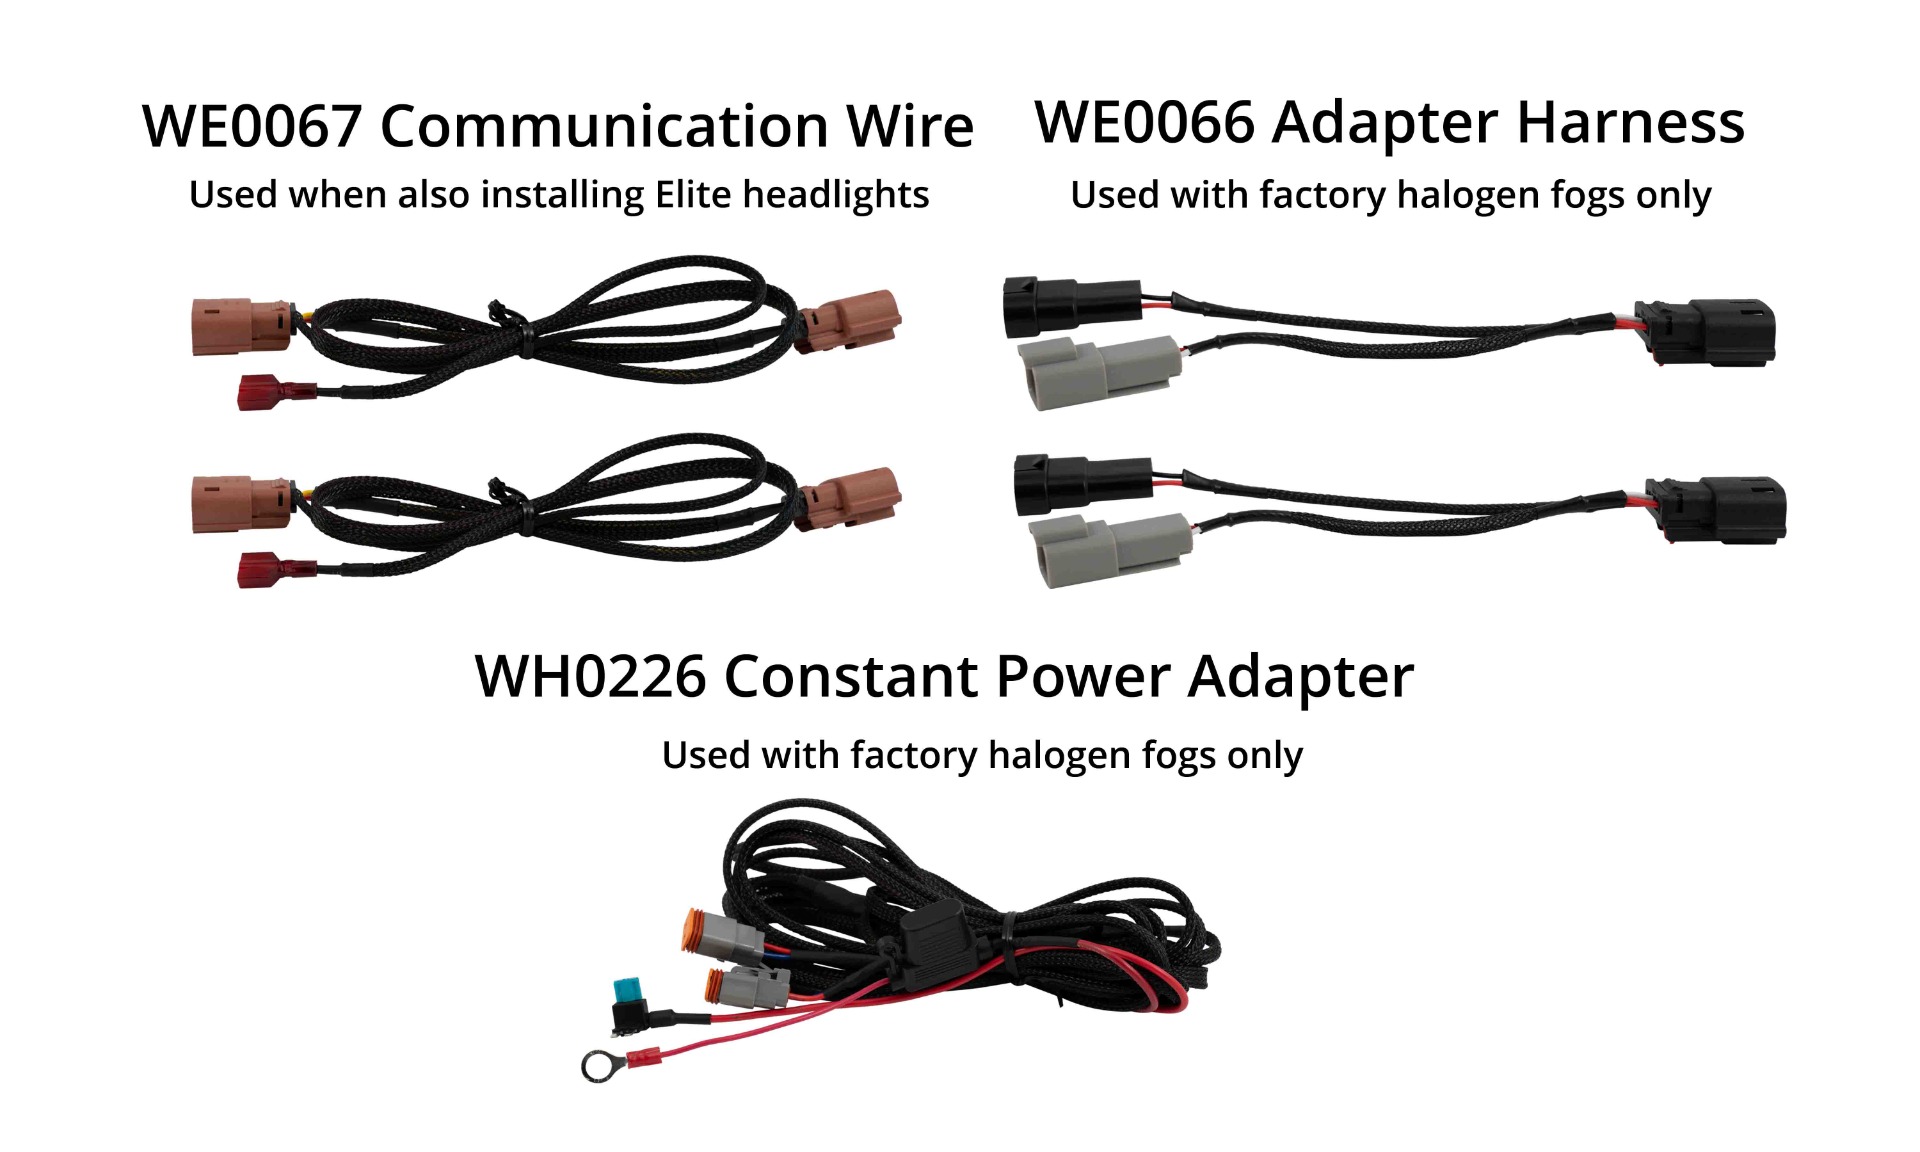
Mounting Instructions
Step 1 - Remove Bolts.
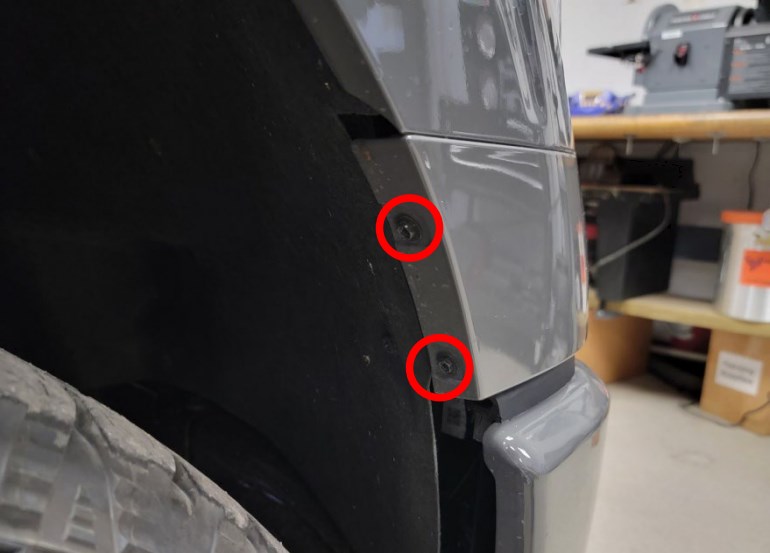
Beginning on the passenger side, use the 7mm socket to remove the two 7mm bolts securing the fender liner to the fender wall. Then, repeat this step on the driver's side of the vehicle.
Step 2 - Remove Mid-Bumper Trim Panel.
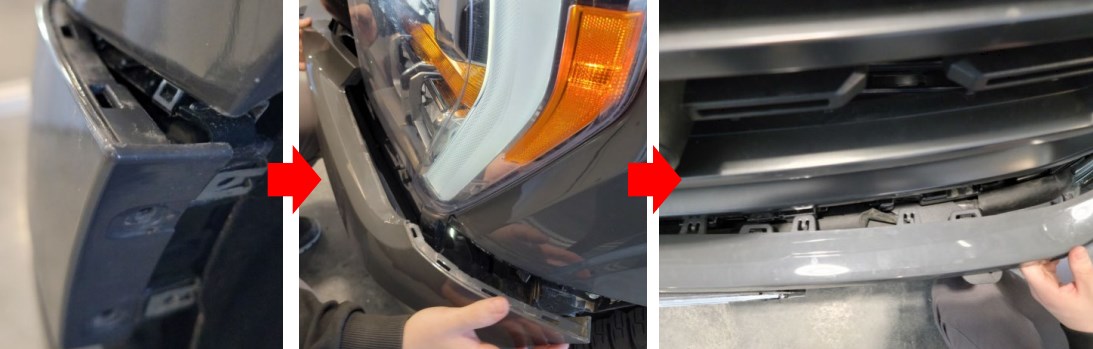
Starting from the front wheel wells, and working your way in, remove the mid-bumper trim panel by carefully pulling it away from the truck until each retention clip releases.
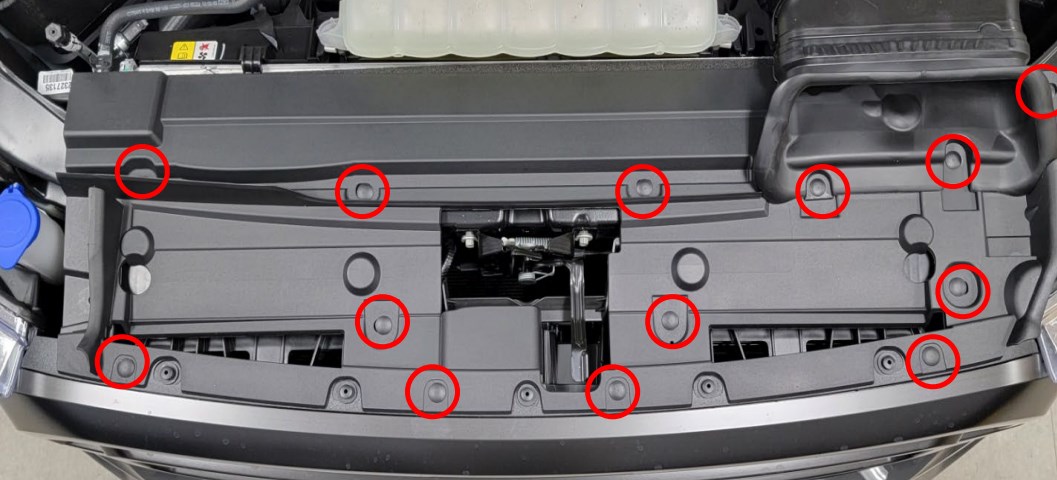
Step 3 - Remove Radiator Core Support Panel.
Open the hood and locate the black radiator core support panel.
Using a plastic trim removal tool, remove the 13 plastic clips holding the support panel in place.
Then, remove the panel by pulling it upward.
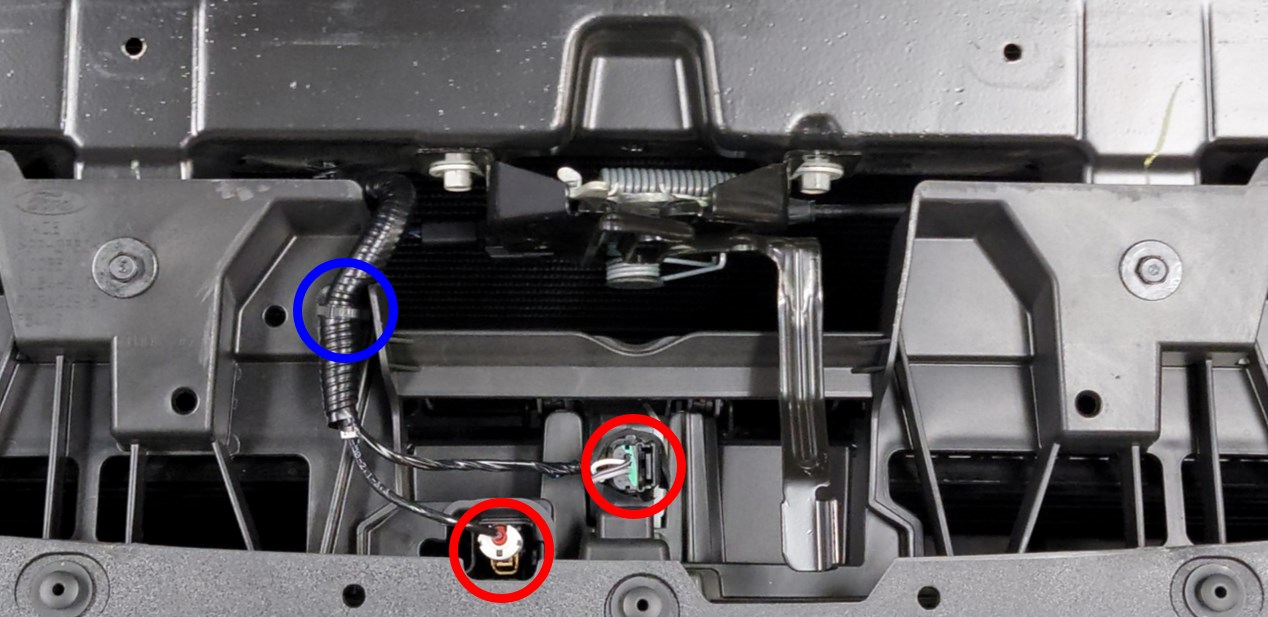
Step 4 - Disconnect Harnesses.
Disconnect the harness connectors near the hood latch (circled in red) and remove the retaining clip for the harness (circled in blue).
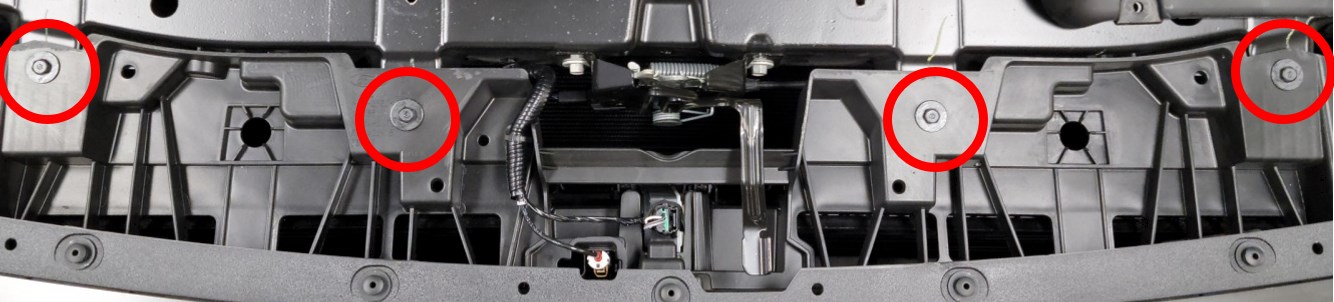
Step 5 - Remove Grille Top Bolts.
Using a 10mm socket, remove the four 10mm bolts securing the grille to the top of the radiator core support.
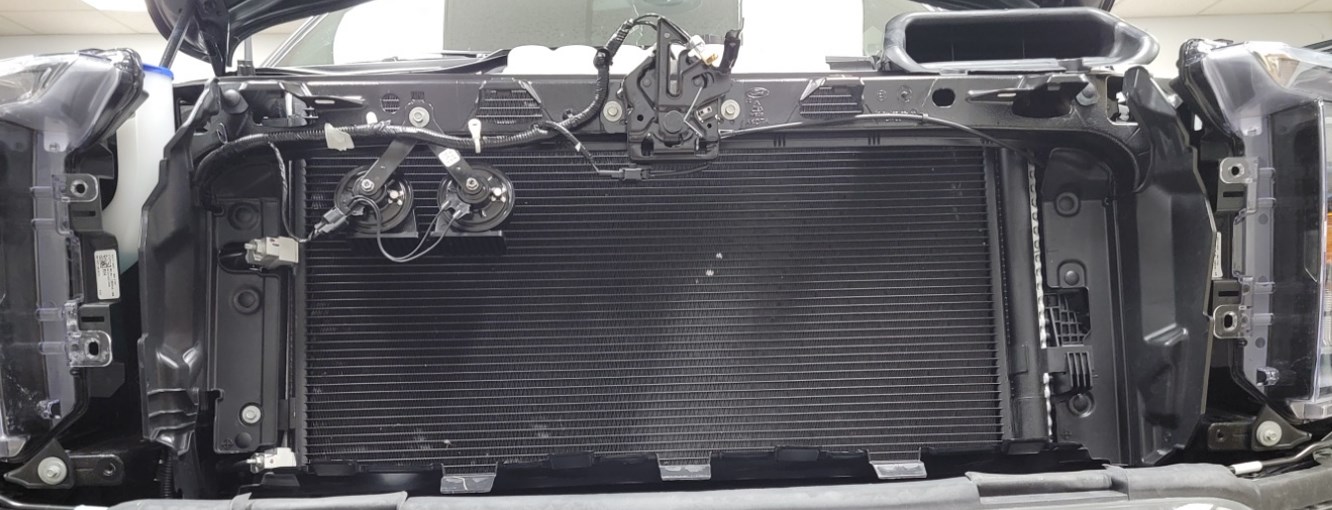
Step 6 - Remove Front Grille Bolts.
Using an 8mm socket, remove the two 8mm bolts securing the grille in the bottom corners near the headlights.

Step 7 - Remove Grille.
Remove the grille by carefully pulling away from the vehicle, and set it aside.
Step 8 - Remove Factory Headlight Fasteners.
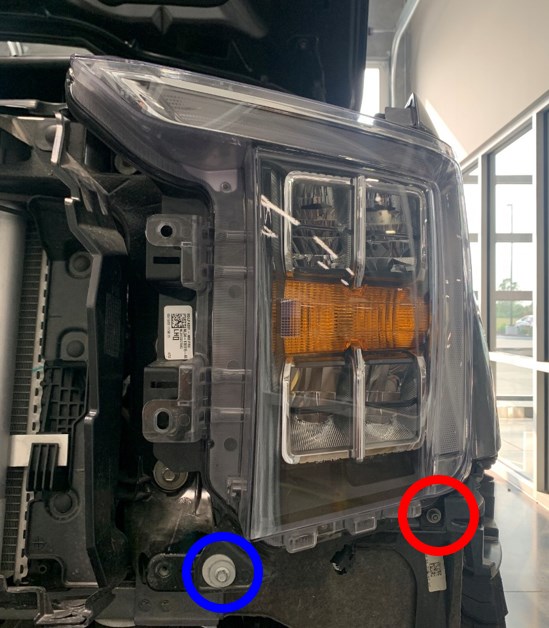
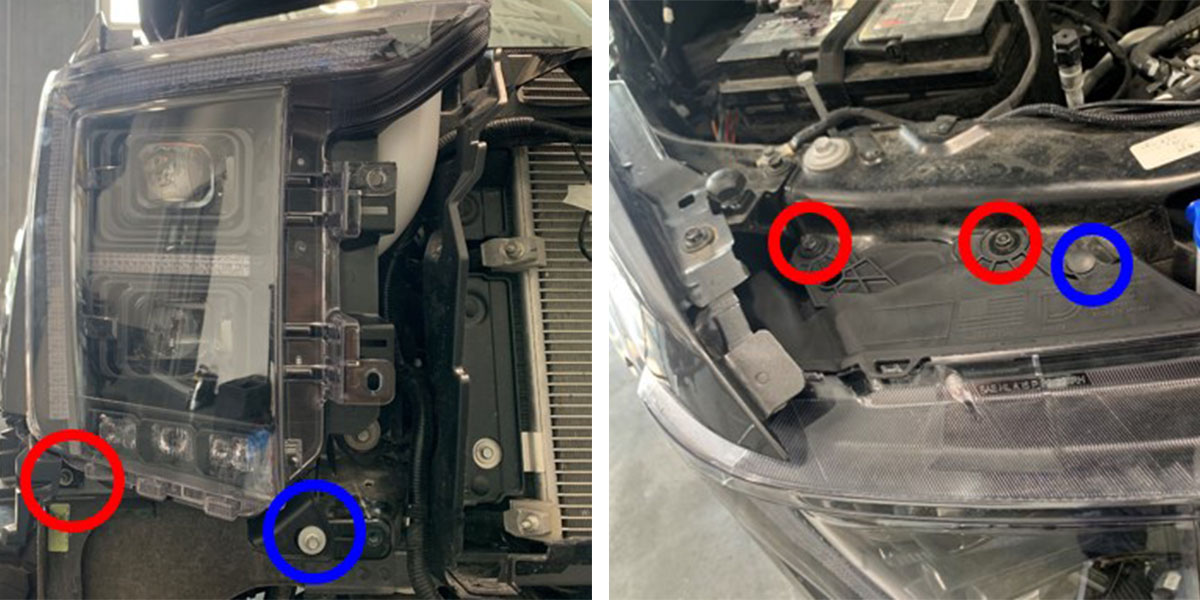
Beginning on the Driver's side, use a plastic trim removal tool to remove the clip (circled in blue) from the top of the headlight. Then, use a 10mm socket to remove the two 10mm bolts (circled in red) from the top of the headlight.

Using an 8mm socket, remove the 8mm bolt on the bottom-exterior corner of the factory headlight (circled in red). Then, use a 10mm socket to remove the 10mm nut on the bottom-interior corner of the factory headlight (circled in blue).
Step 9 - Disconnect Headlight Harnesses.
With the fasteners removed, tug the headlight firmly towards you to release the remaining ball pin clip. Then, lean the headlight forward and disconnect the three wiring harness connectors from the back of the headlight. Once those are disconnected, remove the factory headlight from the F-150.

Step 10 - Remove Passenger Side Headlight.
Repeat Steps 8 and 9 on the Passenger side of the vehicle to remove the remaining factory headlight.
Step 11- Route Amp Connector Harness.
Note: If your F-150 has factory LED headlights, skip to Step 12.
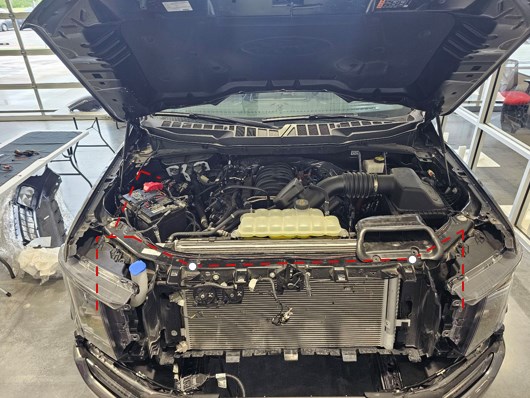
If your F-150 has halogen factory headlights, you'll need to use the included amp connector harness to deliver constant power to the Elite Headlights. To route the amp connector harness, we recommend following the factory wire loom as shown below.
Connect the ring terminal of the amp connector harness to the positive terminal of the truck battery.
Then route the amp connectors to where the Elite Headlights will be installed on the F-150.
During Step 13, the amp connectors will plug into the #6 connector on the Adapter harness of the Driver's side and Passenger side Elite LED Headlights.
Step 12 - Route Off-Road Switch Harness.
Note: This step is for the Elite Max Headlight. If you have the Elite headlight, proceed to Step 13.
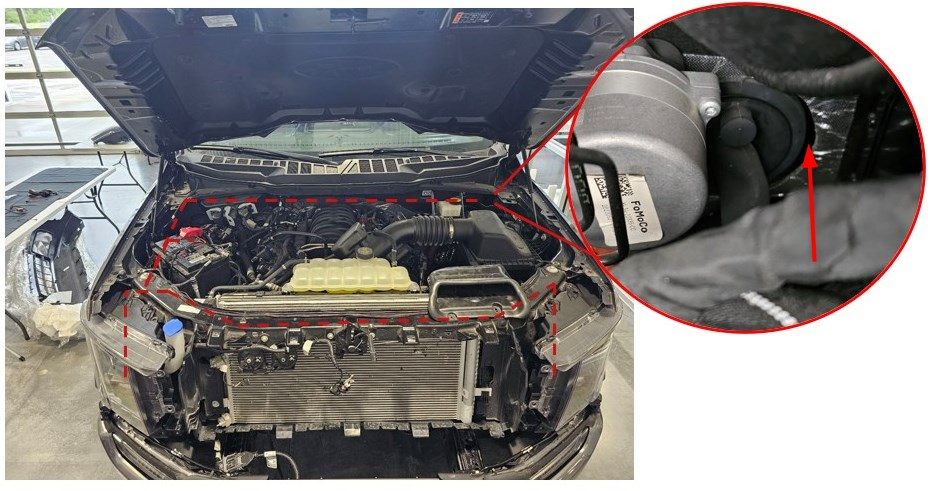
To route the off-road switch harness, we recommend following the factory wire loom as shown below.
Connect the positive and negative ring terminals of the harness to the positive and negative terminals on the battery. Then, route the DT connectors of the switch harness to where the Elite Max Headlights will be installed on the F-150.
During Step 13, the amp connectors will plug into the #2 connector on the Adapter harness of the Driver's side and Passenger side Elite Max LED Headlights.
Next, run your auxiliary switch wire through the firewall and into the cabin. We recommend using the grommet located next to the brake booster in the magnified circle photo below.
Step 13 - Connect the Adapter Harness.
Plug the connectors of the included Adapter Harness into the respective vehicle connectors that were unplugged from the factory headlight in Step 9.
The same Adapter Harness will be used for both The Elite and Elite Max Headlights. However, the connectors you will use depend on whether your F-150 has halogen or factory LED headlights, and whether you purchased the Elite or Elite Max Headlight.
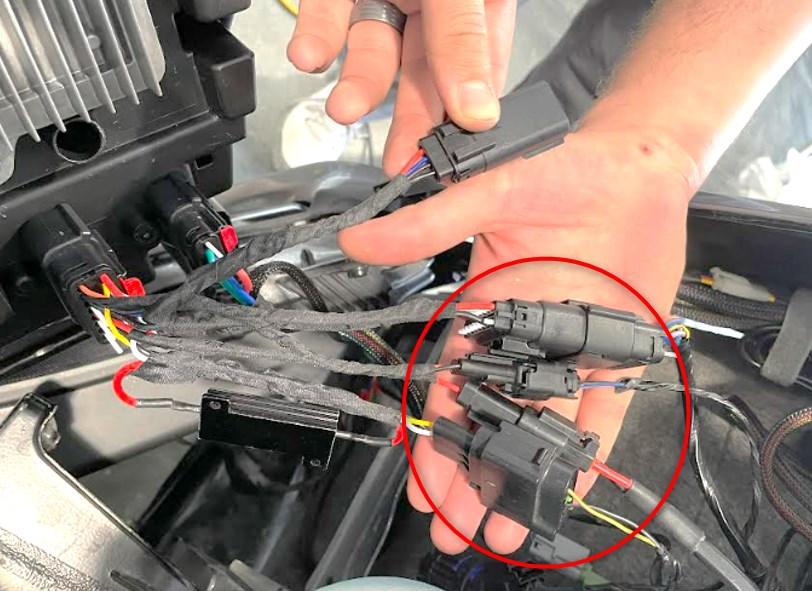
Refer to the image and table below to see which connectors you will need to connect. Each connector is uniquely keyed, so it will only fit the appropriate connector.
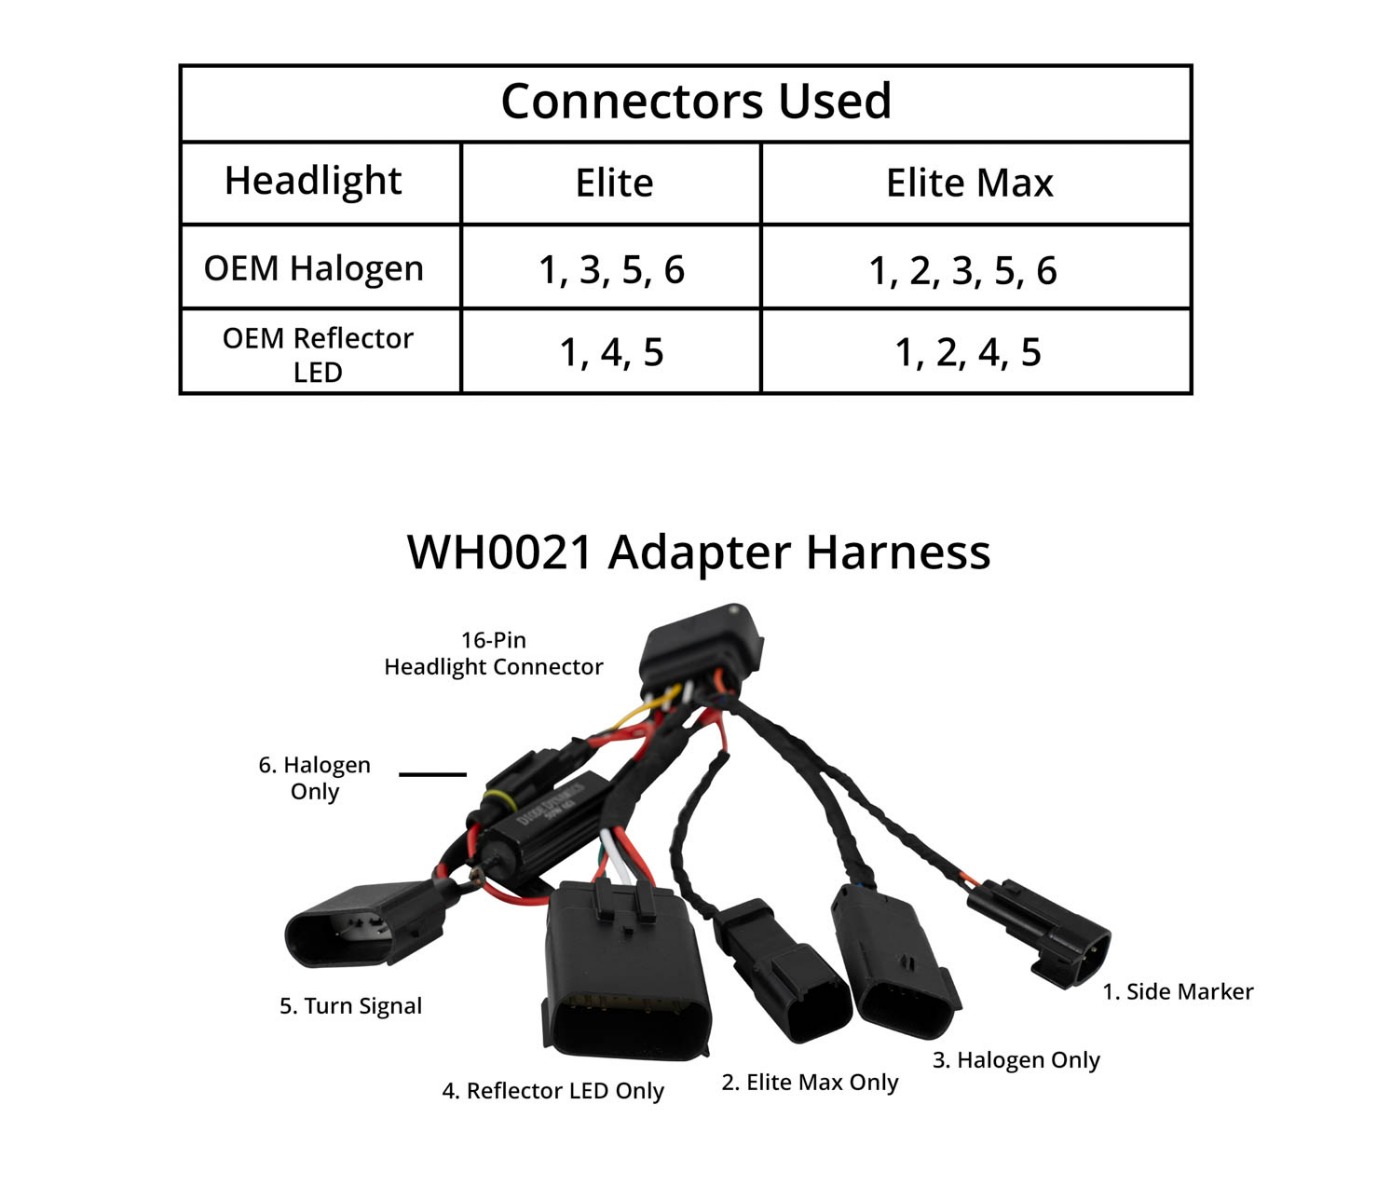
Note: The resistor that is a part of the #5 Turn Signal connector on the adapter harness will hang freely after the harness has been installed.
Step 14 - Route Elite LED Fog Light.
Note: If you are installing the Elite LED Headlights only, skip this step and proceed to Step 15.
If you are installing the Elite LED Fog Lights for the 2021-2023 Ford F-150 with the Elite Headlights, connect one of the included Communication wires to the back of the Passenger side headlight in the area indicated with a red circle below. There is a plastic cap covering the port that will need to be removed first.
Then, connect the other Communication wire to the Driver's side headlight.
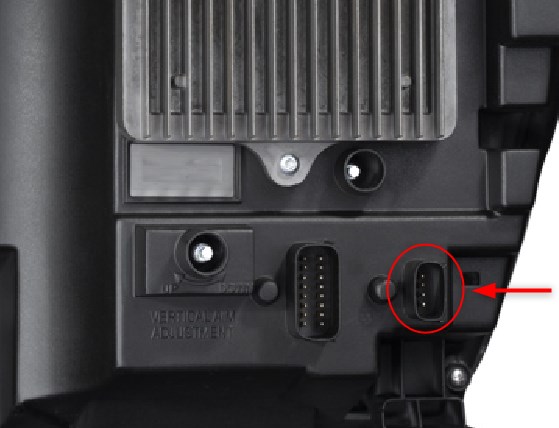
Next, route the other ends of the Communication wires down to the installed Passenger and Driver's side Elite Fog Lights and insert the Communication wire connectors into the indicated areas circled in red below.

Step 15 - Mount Elite LED Headlights.
Beginning on the Passenger side, plug the 16-Pin connector from the included Adapter Harness into the back of the new Elite LED Headlight.
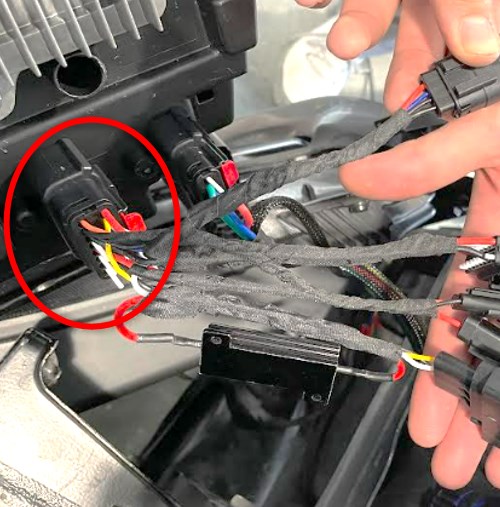
Then, use the factory hardware fasteners removed in Step 8 to mount the Elite LED Headlight. Repeat this step on the Driver's side of the vehicle.
Step 16 - Test Function.
Test the functionality of your new Elite LED Headlights to ensure proper operation before reinstalling the grille.
Step 17 - Reinstall Grille.
Using an 8mm socket, secure the two 8mm bolts that were removed in Step 6 in the bottom corners of the grille.
Step 18 - Reinstall Top Grille Bolts.
Using a 10mm socket, reinstall the four 10mm bolts that were removed in Step 5 on the top of the grille.
Step 19 - Connect Harnesses.
Reconnect the harness connectors near the hood latch (circled in red) and reinstall the retaining clip for the harness (circled in blue).
Step 20 - Reinstall Radiator Core Support Panel.
Replace the radiator core support panel removed in Step 3, and reinsert the 13 plastic clips.
Step 21 - Access Headlight Adjusters.
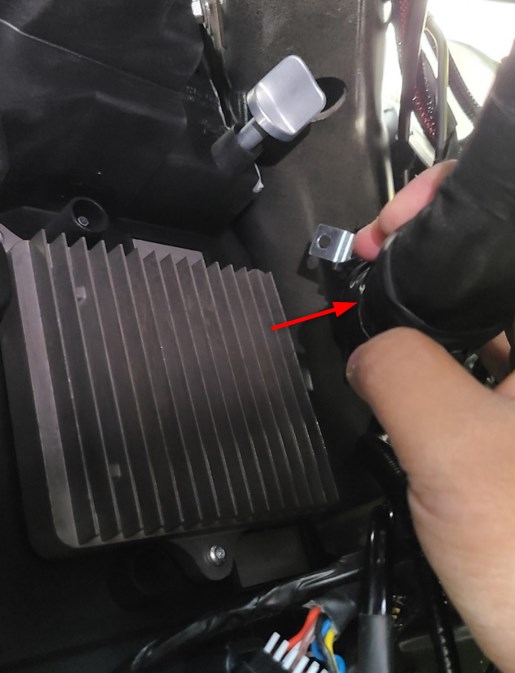
Beginning on the passenger side, reach through the wheel well liner and unclip the wiring harness as shown. This makes it easier to reach the top Vertical Aim Adjuster. Repeat this step to unclip the wiring harness on the Driver's side.
Step 22 - Aim the Headlights.
For aiming instructions, you can watch the video below and then keep reading for more information.
With the F-150 positioned on a level surface 23 feet from a wall, use a tape measure to measure the height of the aiming dots on the exterior lenses of the installed Elite headlights on both the Driver and Passenger side of the vehicle. Then horizontally mark those heights on the wall using a single long piece of tape (they should be the same height).
After you've marked the measured heights on the wall, add another long piece of tape exactly three inches below that. Once your two tape lines are placed, turn on the headlights.
The top headlight gradients should be the same height as the top tape marker. The bottom light gradients should be exactly three inches below the top gradient matching your bottom tape marker.
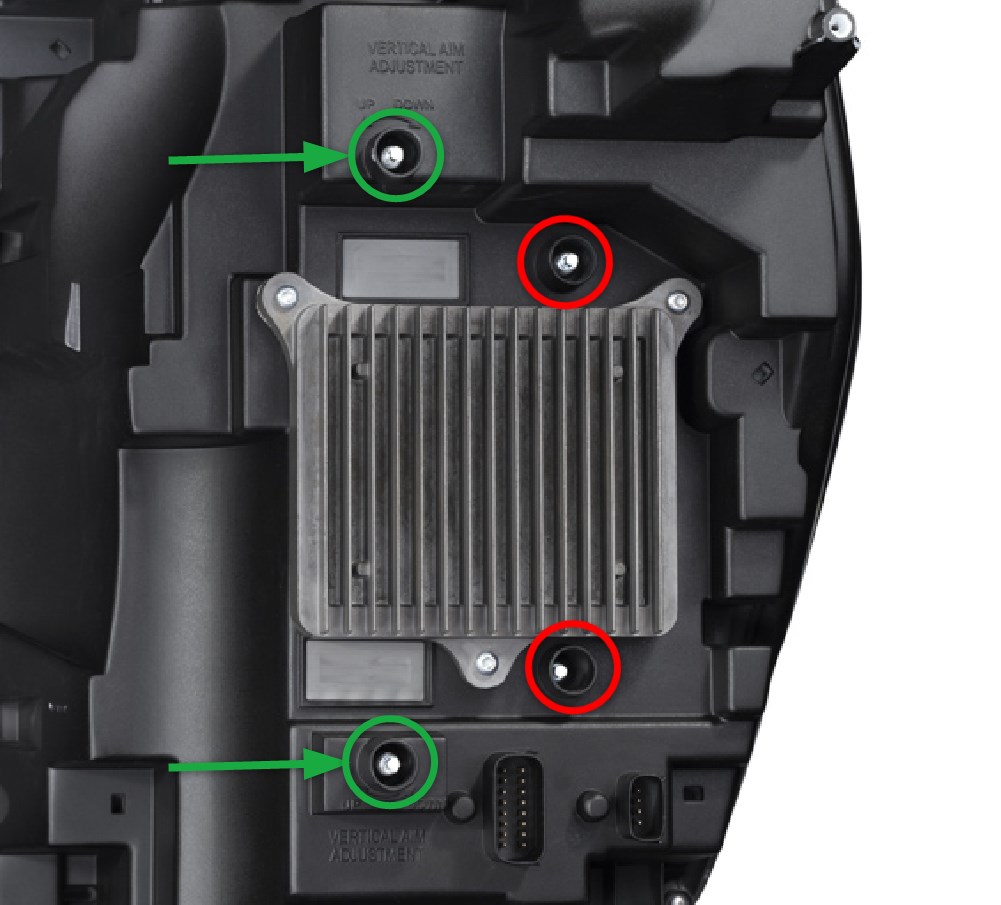
Using the provided adjuster tool or a 4mm socket, rotate the Vertical Adjustment screws (circled in green below) as needed.
To aim the lights higher up, rotate counter-clockwise. To aim the lights further down, rotate clockwise.
Note: It is not recommended to alter the setting of the Horizontal Aim Adjusters (circled in red) since Elite Headlights are aimed horizontally before leaving the factory.
Step 23 - Reinstall Mid-Bumper Trim Panel.
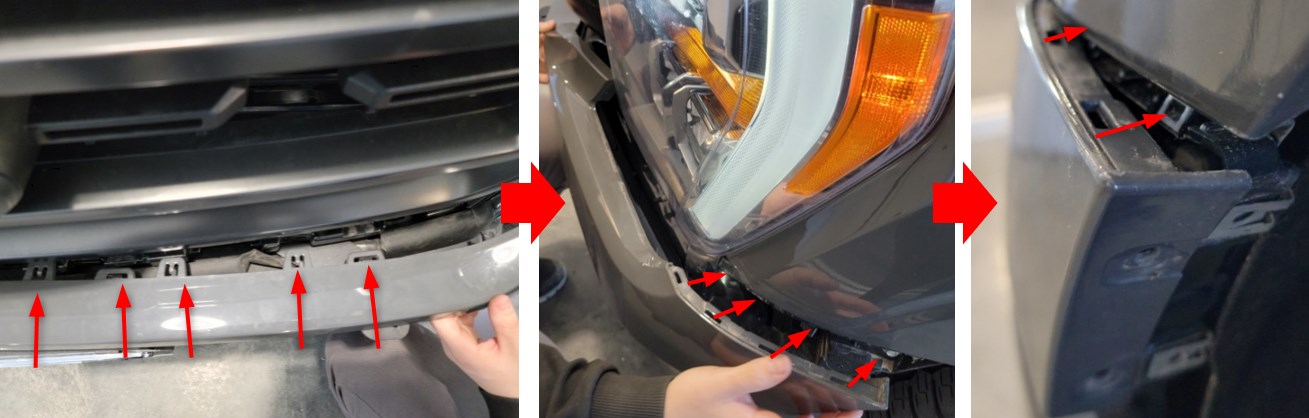
After aiming the headlights, carefully reinstall the mid-bumper trim panel on the F-150 by lining it back up to its original position. Then, starting in the middle and working your way outward, push the trim panel into the vehicle until the clips snap into place.
Step 24 - Reinstall Bolts.
Once the mid-bumper trim panel is firmly in place, use the 7mm socket to reinstall the 7mm bolts removed in Step 1. Be sure to reinstall the bolts on both the Passenger and Driver's side.
The installation is now complete. Enjoy your new Elite LED Headlights for the 2021-2023 Ford F-150!
Programming Instructions
To program your selectable DRL, and show mode if you have the Elite Max Ford F-150 Headlight, follow our step-by-step programming guide.
Questions About the Installation?
If you have any questions or issues installing the Elite LED Headlights for the 2021-2023 Ford F-150, please contact us for further information.
Where Can I Buy Elite LED Headlights for the 2021-2023 Ford F-150?
If you're ready to upgrade your 2021-2023 Ford F-150 with Elite LED Headlights, you can purchase them by clicking here, or using our dealer locator to find a dealer near you.
Want to know more about Diode Dynamics products? Visit DiodeDynamics.com and subscribe to our newsletter for new product releases and more!
This Installation Guide is for the following SKUs: DD5168, DD5167, DD5178, DD5177

Share This Post