


The SS5 Grille CrossLink LED Light Bar Kit for the 2019-2023 Ram 1500 from Diode Dynamics allows you to mount four linked SS5 LED pods in front of the factory grille, and the SS5 Bumper LED Pod Kit for the 2019-2023 Ram 1500 allows you to mount two SS5 LED pods on the factory bumper. The following installation guide will provide you with detailed instructions on how to install both the LED Light Bar and Pod Light Kits.
Table of Contents
Installation Tools
- 1/4" & 3/8" Ratchets
- 8mm Shallow Socket
- 10mm Socket
- Wire Cutters
- Metal Pry Tool
- 5mm Allen Wrench
- A Dremel With A Cutoff Wheel (Or Similar Cutting Tool)
Mounting Instructions
Step 1 - Remove Splash Shield.
If equipped, remove the plastic splash shield from underneath the engine bay area of the vehicle.
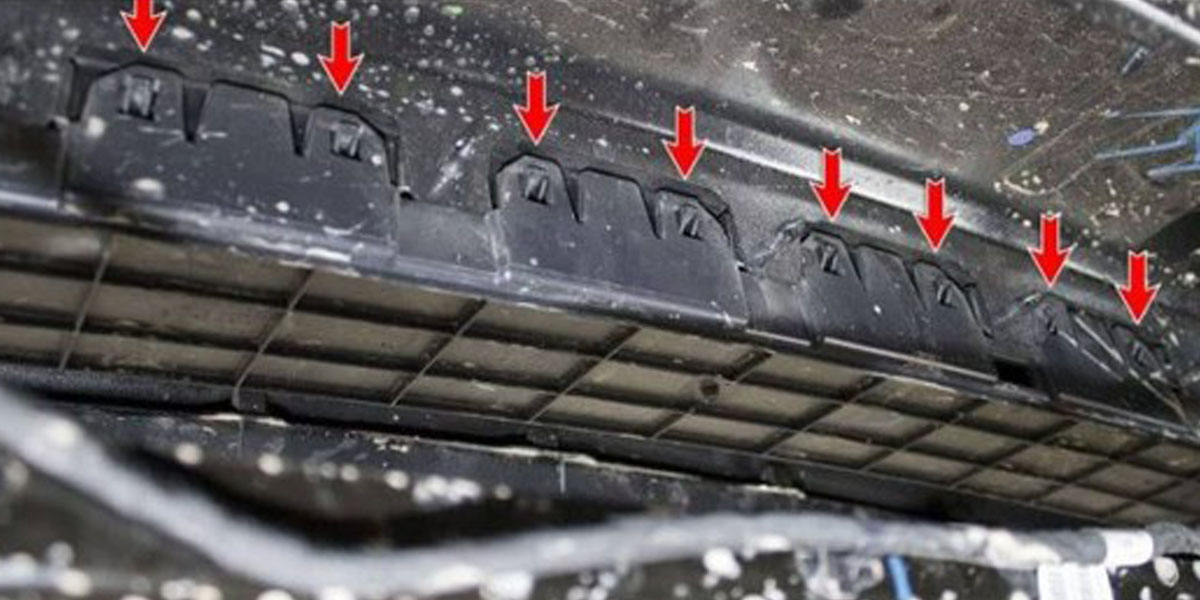
Step 2 - Remove Rear Cover.
If your vehicle is equipped with a vented lower grille, you will need to remove the rear cover behind the lower grille. From underneath the vehicle, pull the retention tabs away from the mating clips (shown below) and slide the cover back to remove it.
Step 3 - Disconnect Sensors.
If your vehicle is equipped with parking sensors, disconnect the factory harnesses on the passenger and driver side of the vehicle. These sensors are located on the plastic lower grille and can be accessed from the underside of the vehicle.
Note: If you're removing the parking sensors, note their installed placement before removal. Improper reinstallation of the factory parking sensors can cause the sensors to malfunction.
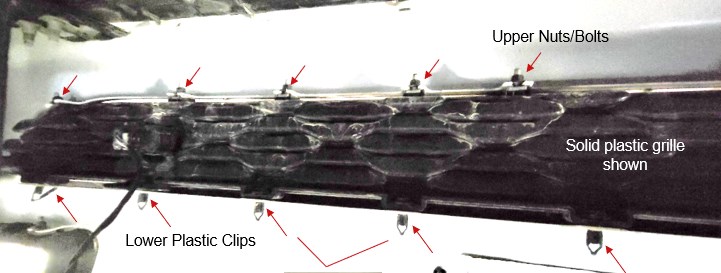
Step 4 - Remove Nuts/Bolts.
The lower plastic grille is secured with 9 lower plastic clips and 9 upper nuts/bolts.
Using a metal pry tool, remove the 9 lower clips by prying them upward.
Then, using an 8mm shallow socket, loosen, but do not remove, the 9 nuts on the top.
Slide the plastic grille forward from the bumper to remove it.
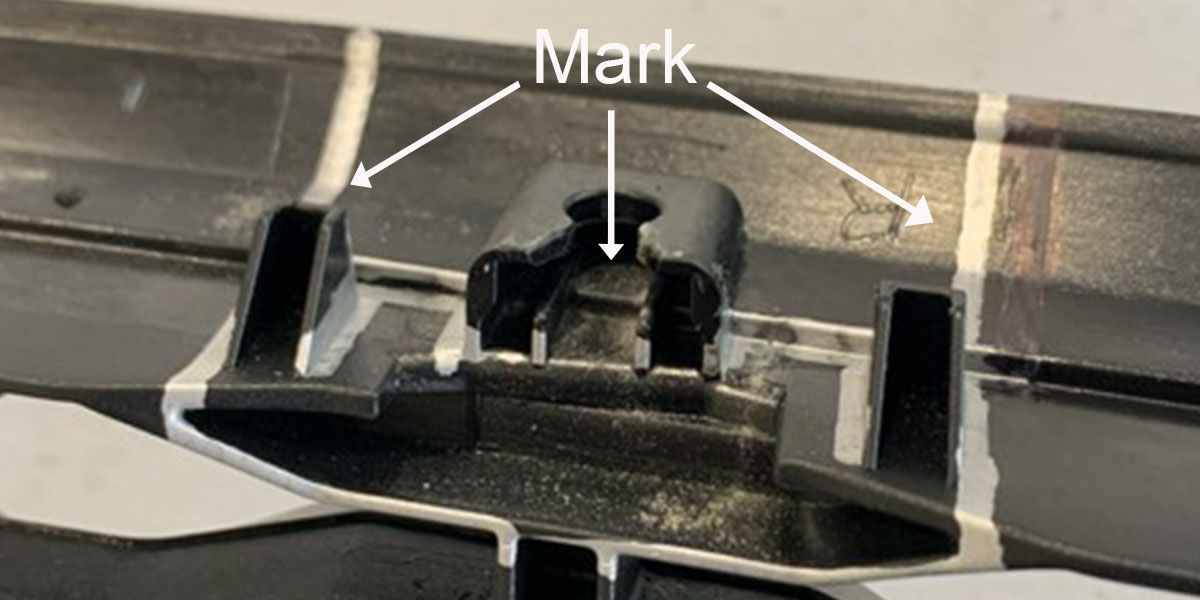
Step 5 - Cut Upper Grille.
It is necessary to cut off sections of the plastic grille using a Dremel with a cutoff wheel or similar tool. Try to make these cuts as straight as possible since they will be partially visible after the installation is complete.
Beginning with the passenger side of the upper grille, mark cutting lines as pictured below.
After you've marked your cutting locations, cut off the curved upper portion of the grille marked "Cut-Off First" in the image below. Then, trim off the tabs of the plastic grille marked "Cut-Off Second" in the image below.

Repeat these cutting steps on the driver's side of the grille.
Step 6 - Cut Lower Grille.
Begin by marking the passenger side of the plastic grille with cutting lines as pictured below.
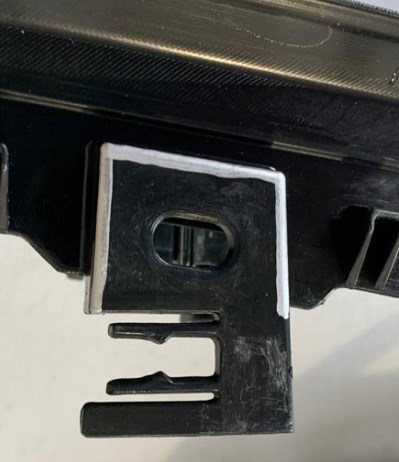
After you've marked your cutting locations, remove the lower tab as shown in the image below using a Dremel with a cutoff wheel or similar tool.

Repeat these cutting steps on the driver's side of the grille.
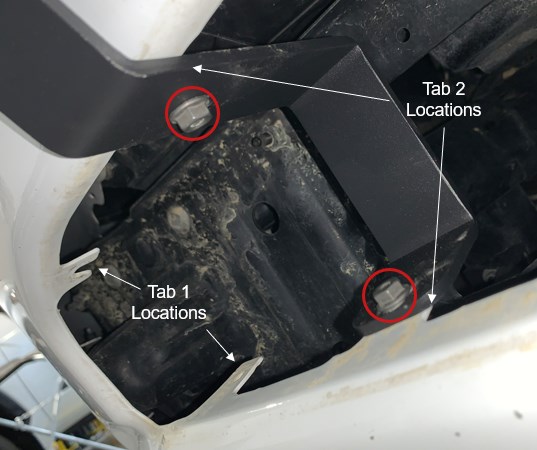
Step 7 - Install Bracket.
Using a 10mm socket, install and tighten one of the SS5 bumper brackets on the passenger side of the vehicle using the 10mm bolts and nuts supplied with the kit.
The bumper bracket bolts to the Inner tab 2 location as pictured below. Repeat this step to install the remaining SS5 bumper bracket on the driver's side of the vehicle.
Step 8 - Reinstall Grille.
Slide the grille into the lower bumper opening from the front.
Using the 8mm shallow socket, temporarily secure the top of the plastic grille with the 9 nuts/bolts previously loosened in Step 4.
Install the 9 lower clips previously removed in Step 4 to secure the bottom of the plastic grille.
Tighten the 9 nuts/bolts on the top of the grille to complete the reinstallation of the lower plastic grille.
Reconnect the parking sensor harnesses disconnected in Step 3, if equipped.
If applicable, reinstall the rear cover removed in Step 2.
Step 9 - Install Pods.
If you purchased the SS5 LED Pod Light Bumper Kit, follow the SS5 Universal Mounting Guide and use the included mounting brackets and hardware to install your SS5 LED Pods directly onto the grille brackets.
If you purchased the SS5 CrossLink LED Light Bar Kit, skip to step 10.
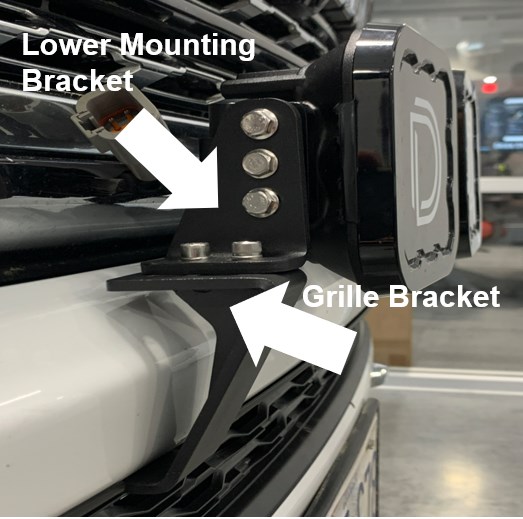
Step 10 - Install Low Mount Bracket.
If you purchased the SS5 CrossLink LED Light Bar Kit, mount the passenger-side SS5 low-mount bracket onto the grille brackets using the included M6 hardware as shown below. Repeat this step on the driver's side of the vehicle using the driver-side low-mount bracket.
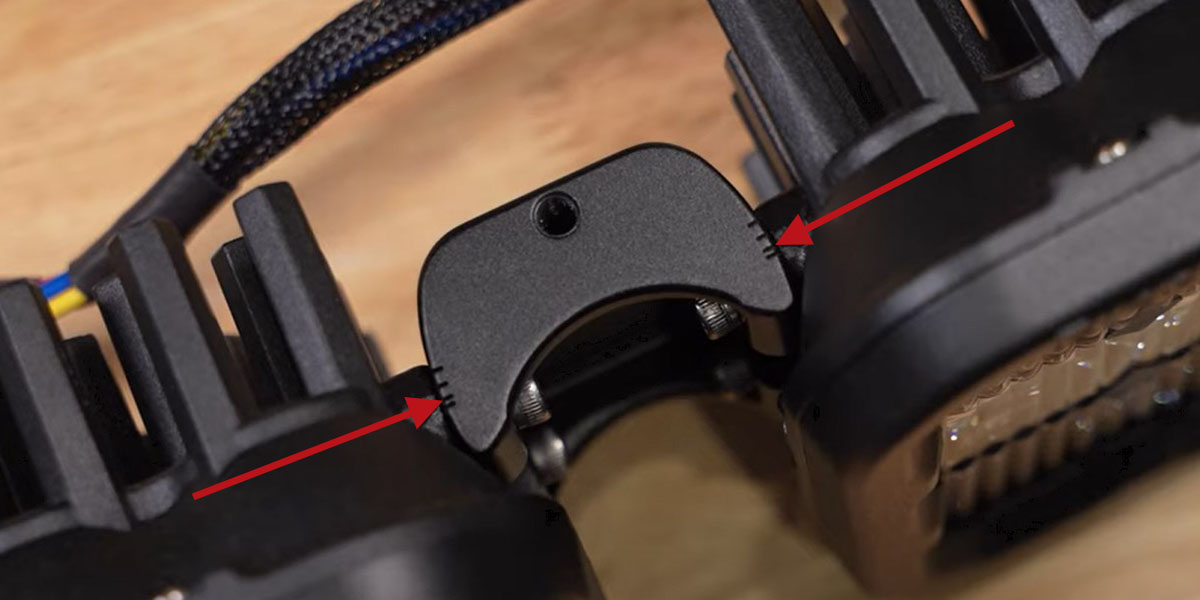
Step 11 - Assemble and Mount CrossLink Lightbar.
Assemble and mount your SS5 CrossLink LED lightbar using the CrossLink assembly instructions found here.
Note: This SS5 CrossLink lightbar will be assembled in a curved configuration. In order to achieve the correct curve, the CrossLink lightbar should be secured to the bottom of the second notch on the link as shown below.
Wiring Instructions

Step 12 - Route Switch.
Determine a suitable location to mount the switch and route the switch wiring to that location. This may require going through the vehicle's firewall. We recommend unplugging the toggle switch from the harness to route the wires more easily. Drill an appropriately sized hole for the switch. Then reconnect the wires to the switch and mount it (A).
Step 13 - Route Harness.
Connect the wiring harness DT Connectors (B) to the SS5 LED pods.
Then, route the harness to the battery. Be sure to avoid areas with excessive heat buildup or moving parts. We recommend following the vehicle manufacturer's wiring harness.
Step 14 - Connect to Battery.
Connect the split ring terminals on the wiring harness to the battery (C). The black (ground) wire should be connected to the negative battery terminal and the red (power) wire should be connected to the positive battery terminal.
Step 15 - Complete Installation.
Once powered, turn the SS5 LED Pods on and thoroughly test their functionality. Then aim the lights as desired and tighten all hardware to complete the installation.
Programming Instructions
Step 1 - Enter Programming Mode.
Start with all power turned off. Cycle the backlight power on and back off three times quickly, within three seconds. (ON-OFF-ON-OFF-ON-OFF)
You are now in programming mode.
Step 2 - Cycle to Color.
Continue cycling power quickly until the desired color is selected, leaving it on that color. (ON-OFF...-ON)
Step 3 - Save Color.
Leave the desired color on for 5 seconds. This color will be saved, and the lamp will exit programming mode.
Step 4 - Turn Off.
Turn off the power. The saved color will now appear any time backlight power is applied, under normal operation.
Step 5 - Select New Color.
To select a new color, repeat these steps to enter programming mode, and save a new color. You can start over and exit programming mode at any time by leaving the backlight on for more than 5 seconds, then switching it off.
Color Reset
If you have multiple lamps connected together, it is possible that one or more colors may get “out of sync” with the others. If this happens, follow the Color Reset procedure.
Step 1 - Enter Programming Mode.
Enter programming mode by cycling power on and back off three times quickly, within three seconds. (ON-OFF-ON OFF-ON-OFF)
Step 2 - Cycle Power.
Continue cycling power quickly, going through all color options twice. This will take at least 16 power cycles.
Step 3 - Save White Color.
After all of the colors have been displayed twice, all lamps will reset to White, the default color, and will not continue to change colors. Once all lamps are only displaying white backlights, leave the power on for 5 seconds to save the White color.
Step 4 - Complete Reset.
All lamps are now set to White again. You may proceed to program your desired backlight color as normal.
Questions About the Installation?
If you have any questions or issues installing the SS5 Grille CrossLInk LED Lightbar Kit or the SS5 Bumper LED Pod Light Kit for the 2019-2023 Ram 1500, please contact us for further assistance.
Where Can I Buy an SS5 Grille CrossLink LED Light Bar Kit or an SS5 Bumper LED Pod Light Kit for the 2019-2023 Ram 1500?
If you're ready to upgrade your 2019-2023 Ram 1500 with an SS5 Grille CrossLink LED Light Bar or an SS5 Bumper LED Pod Light Kit, you can do so by clicking here or using our dealer locator to find a dealer near you.
Want to know more about Diode Dynamics products? Visit DiodeDynamics.com and subscribe to our newsletter for new product releases and more!
This Installation Guide is for the following SKUs: DD7607, DD7608, DD7609, DD7610, DD7611, DD7612, DD7613, DD7614, DD7615, DD7616, DD7617, DD7618, DD7619, DD7620
Share This Post