


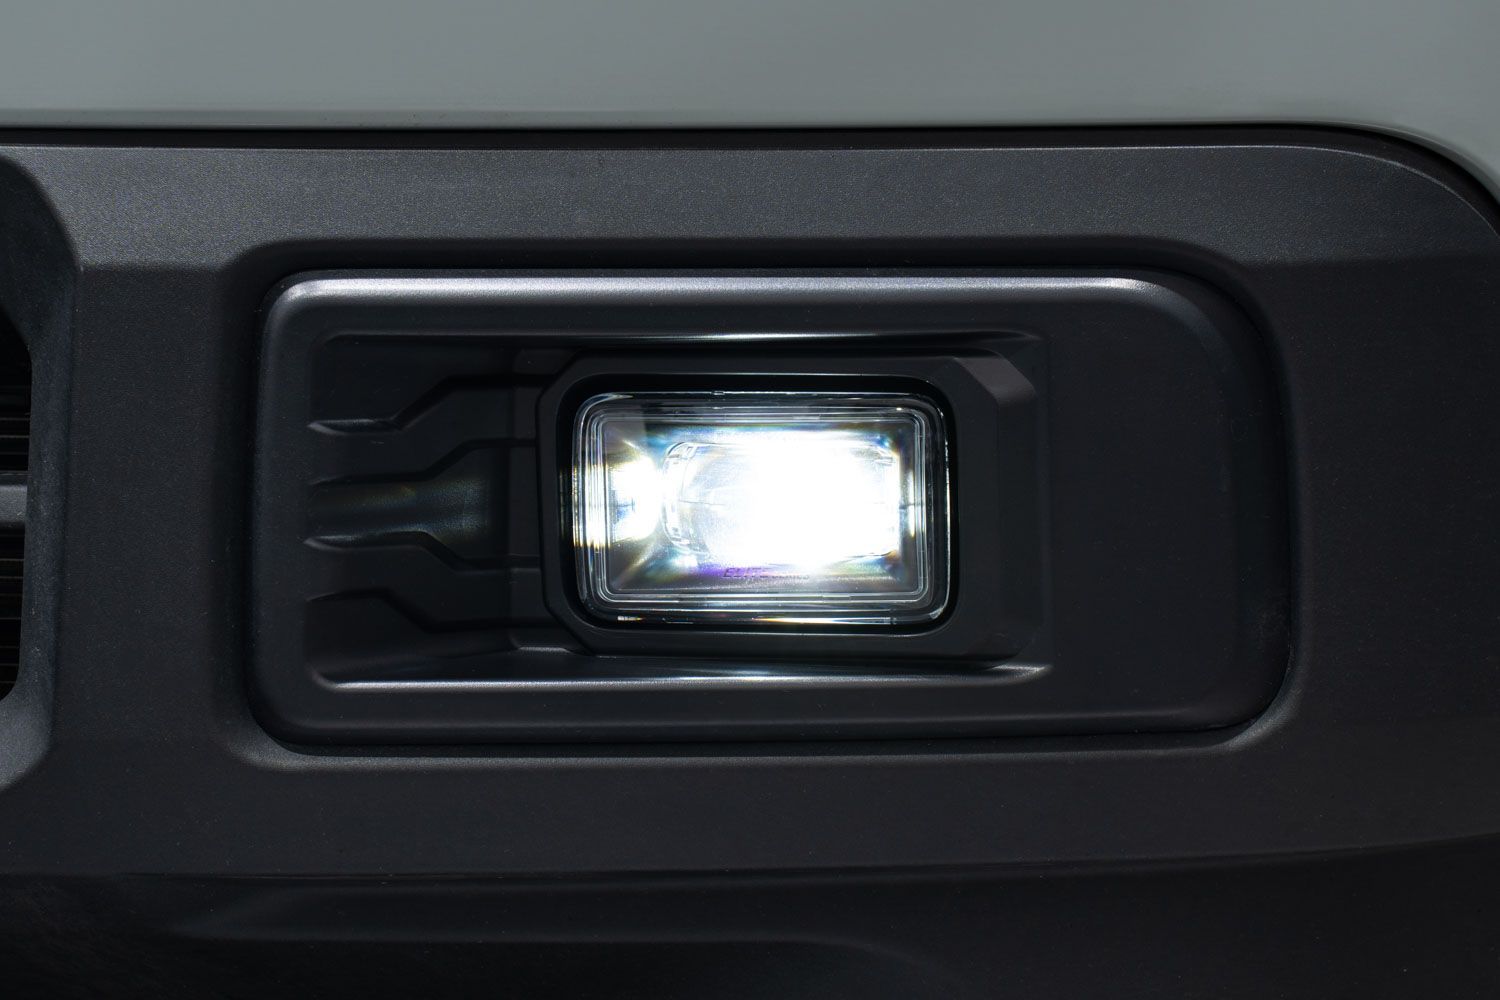
The Diode Dynamics Add-On Fog Light Harness allows you to add fog lights to your vehicle that will work in the same way as a factory-installed fog light. The fog lights will turn on automatically any time the headlights are turned on, and the fog light switch is in the on position. When routing harnesses, avoid areas that may be subject to heat buildup or moving parts. We recommend following the path of the original manufacturer's wiring harnesses.
Table of Contents
Installation Tools
- Basic Wiring Tools
Method One - Add New Switch to Vehicle
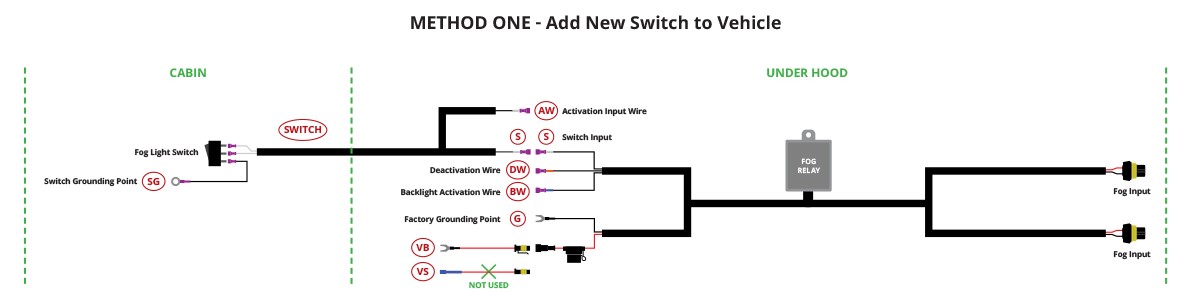
Step 1 - Route Wiring Harness
Route wiring harness near the fuse box, under your hood. Run the output wire to the fog location on each side of the vehicle. Route the Switch into the vehicle cabin, on the driver’s side.
Step 2 - Connect Battery Leads
Connect positive (VB) and negative (G) battery wires to the battery, or to the main power terminals near the fuse box.
Step 3 - Connect Activation Wire
Connect the Activation Input Wire (DW) to your preferred activation signal (AW). Any time this activation signal is powered and the switch is in the On state, the fog lights will be turned on. We recommend tapping the sidemarker or low beam signal, so your fog lights can automatically turn on and back off with your parking lights or low beams.
Step 4 - Connect Deactivation Wire
Connect the Deactivation wire to your preferred signal to disable the fog lights when 12V is applied. We recommend tapping the high beam signal to switch your fog light off when high beam is activated.
Step 5 - Connect Backlight Wire (if applicable)
If you purchased a 4-pin harness with a backlight wire, connect the Backlight Activation Wire (BW) to a fused 12V source to trigger the backlight feature, such as the parking light or running light. Check local laws and regulations for on-road use of backlight feature.
Step 6 - Connect Switch Input Wire
Connect the Switch Input wire to the Fog Relay. (S)
Step 7 - Switch Wires
Inside the cabin, connect the switch wires to the switch, aligning wire colors as shown (SWITCH). Provide ground to the fog light switch using the included grounding wire (SG). Identify a mounting point for the switch in an unused area of the dash, and mount in place.
Step 8 - Connect Output Wires to Lights
Connect output wires to the light on each side of the vehicle.
Step 9 - Test for Function
Secure all wiring, and test for function.
Method Two - Use OEM Upfitter/Auxiliary Switch
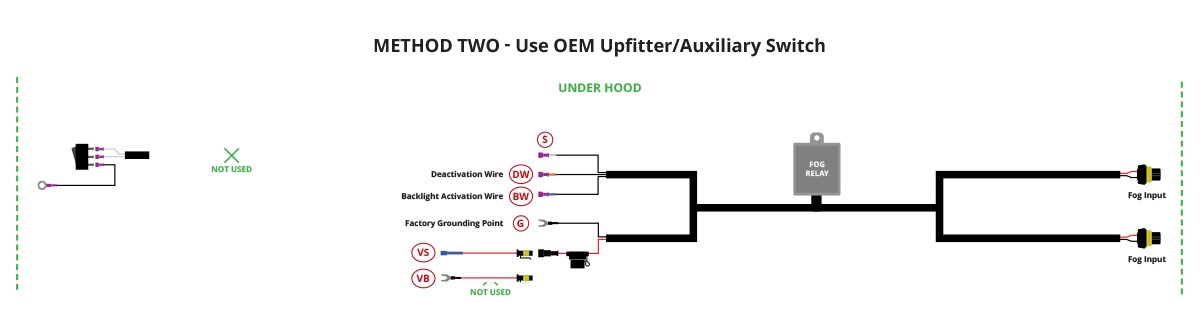
Step 1 - Route Wiring Harness
Route all wires, following instructions for Method One. DO NOT run switch wires into vehicle cabin.
Step 2 - Replace Power Input Wire
Unplug the Battery Input Wire (VB) from the Fog Relay, and replace it with the Power Input Wire (VS).
Step 3 - Connect Power Wire
Using a standard crimp tool, connect the Power Input Wire (VS) to an OEM Auxiliary Switch wire on your vehicle. Ensure the wire selected can provide adequate current for the operation of your lights - reference vehicle manual.
Step 4 - Attach Activation Wire
The Activation Input Wire (S) should be connected to your parking light or headlamp circuit, as described in Method One instructions. Now, your fog lights will activate any time the activation circuit is powered, and your upfitter switch is in the On position.
Step 5 - Connect Deactivation Wire
Connect the Deactivation Wire (DW) to your preferred signal to disable the fog lights when 12V is applied. We recommend tapping the high beam signal to switch your fog light off when high beam is activated.
Step 6 - Connect Backlight Wire (if applicable)
If you purchased a 4-pin harness with a backlight wire, connect the Backlight Activation Wire (BW) to a fused 12V source to trigger the backlight feature, such as the parking light or running light. Check local laws and regulations for on-road use of backlight feature.
Step 7 - Connect Output Wires to Lights
Connect output wires to the light on each side of the vehicle.
Step 8 - Test for Function
Secure all wiring, and test for function.
Functional Notes
1. The activation wire should be connected to an appropriate signal to enable the activation of fog lights. Do not connect directly to constant 12V power or to an ignition power source - this will allow the fog lights to be switched on manually at any time or switched on any time the vehicle is running.
2. The deactivation wire can be used to disable the fog lights when 12V is applied.
3. Any backlight feature, if equipped, is intended only as an accent illumination. Before wiring and using this feature on public roads, check local laws and regulations regarding the use of accent lighting.
Fog Light Aiming Instructions
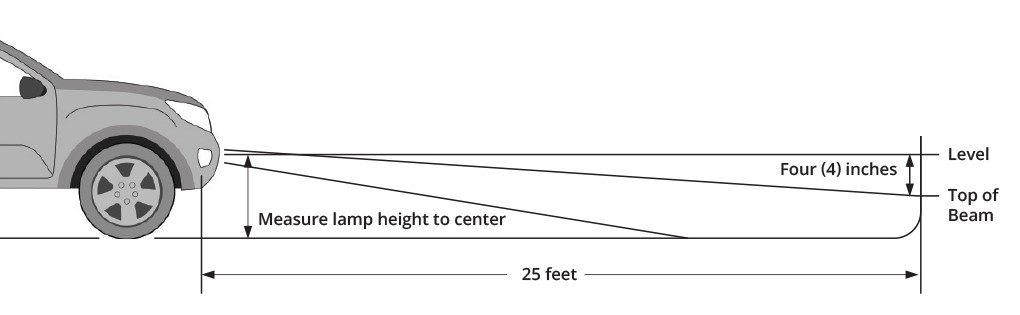
Step 1 - Park Vehicle
Park your vehicle 25 feet away from a wall or garage door on a level surface.
Step 2 - Measure
On your vehicle, measure the distance between the ground and the center of your fog light. This is your mounting height.
Step 3 - Mark Mounting Height Onto Wall
Mark the mounting height on the wall or garage door using tape.
Step 4 - Add Tape Below First Mark
Add another piece of tape four inches below the mounting height. This is your fog light cutoff line.
Step 5 - Aim Lights
Aim your lights on each side, so that the top of the beam pattern is on the cutoff line mark.
The installation is now complete. Enjoy your new fog lights!
Questions About the Installation?
If you have any questions or issues installing the Add-On Fog Light Wiring Harness, please contact us for further assistance.
Where Can I Buy an Add-On Fog Light Wiring Harness?
If you’re ready to add fog lights to your ride with an Add-On Fog Light Wiring Harness, you can purchase one by clicking here or using our dealer locator to find a dealer near you.
Want to know more about Diode Dynamics products? Visit DiodeDynamics.com and subscribe to our newsletter for new product releases and more!
This Installation Guide is for the following SKUs: DD4109, DD4110, DD4111, DD4112, DD4113
Share This Post