


Adding color-changing ability to your vehicle with our RGBW Multicolor Underglow LED Kit is a great way to make your vehicle stand out at the next car meet. Thanks to our RGBW technology, this kit features an extra integrated LED chip that is specifically white in color which provides a much more uniform, pure, and bright white color than other kits on the market. When paired with our Bluetooth Controller and app, you can select almost any color imaginable and utilize custom strobing and fading patterns for ultimate customization!
This kit is fully waterproof and includes everything you need to install RGBW Multicolor LED strips underneath your vehicle!
The following installation guide will provide you with basic installation instructions on how to install the RGBW Multicolor Underglow LED Kit on your vehicle. Keep reading for step-by-step instructions below!
Table of Contents
Installation Tools
- Drill
- 3/4" Drill Bit
- Needle Nose Pliers
- Phillips Screwdriver
- Flathead Screwdriver
- Socket Wrench Set
Mounting Instructions
Step 1 - Mount LED Strips.
Locate where to mount the LED strips. Be sure that the surface is clean before mounting. Mount the LED strips using the 3M adhesive backing. Then use zip ties to secure the LED strips.
Wiring Instructions
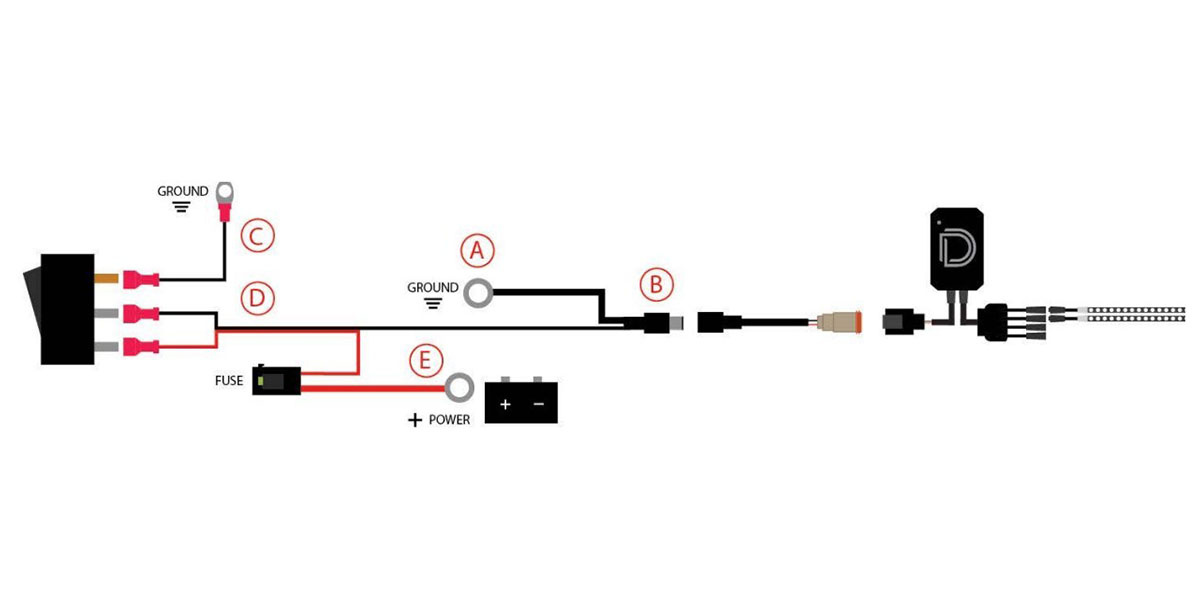
Step 2 - Connect Black Wire.
Connect the ring terminal from the black wire (A) on the wiring harness to a chassis ground or the negative terminal on the battery.
Step 3 - Connect Red Wire.
Connect the red wire (E) on the wiring harness to the positive terminal on the battery.
Step 4 - Connect Wiring Harness.
Connect the LED strips to the wiring harness.
Step 5 - Plug In Connectors.
Plug the DC connector (B) into the included DC-to-DT adapter wire. Then plug the DT connector into your RGBW controller. Plug the M8 connector on each strip into the controller.
Step 6 - Route Wires Into Interior.
Run the red and black wires (D) from the exterior, through the hole in the firewall, and into the interior.
Step 7 - Connect Toggle Switch.
Plug the pink spade connectors from the red and black wires (D) into the silver pins on the back of the toggle switch. Connect the additional ground wire (C) to the copper pin on the switch, and ground it to any bare metal bolt inside the cab. Mount the 3/4” switch wherever you wish.
Troubleshooting
If your RGBW Multicolor Underglow LED Kit is not illuminating, follow these steps:
Step 1 - Check Wiring Connections.
Check that your power (E) and ground (A) connections have full connection and a solid, bare metal ground.
Step 2 - Check Switch Connections.
Check that the spades from the black and red wires (D) are both on the silver male prongs of the switch. Then check that the additional ground wire (C) is on the copper pin.
Questions About the Installation?
If you have any questions or issues installing the RGBW Multicolor Underglow LED Kit, please contact us for further assistance.
Where Can I Buy the RGBW Multicolor Underglow LED Kit?
If you’re ready to upgrade your vehicle with the RGBW Multicolor Underglow LED Kit, you can purchase one by clicking here or using our dealer locator to find a dealer near you.
Want to know more about Diode Dynamics products? Visit DiodeDynamics.com and subscribe to our newsletter for new product releases and more!
This Installation Guide is for the following SKU: DD0442.

Share This Post