


Stage Series Rock Lights are the perfect solution to add useful light to your vehicle with their compact size, wide output, and numerous mounting solutions. Stage Series Rock Lights are available in single-color, dual-color, and RGBW options, depending on the output and control you need. The following installation guide will provide you with basic instructions on how to mount and wire the Stage Series Rock Light Kit. This product should not be used on a 24V system. Disconnect the negative battery terminal before starting your installation.
Table of Contents
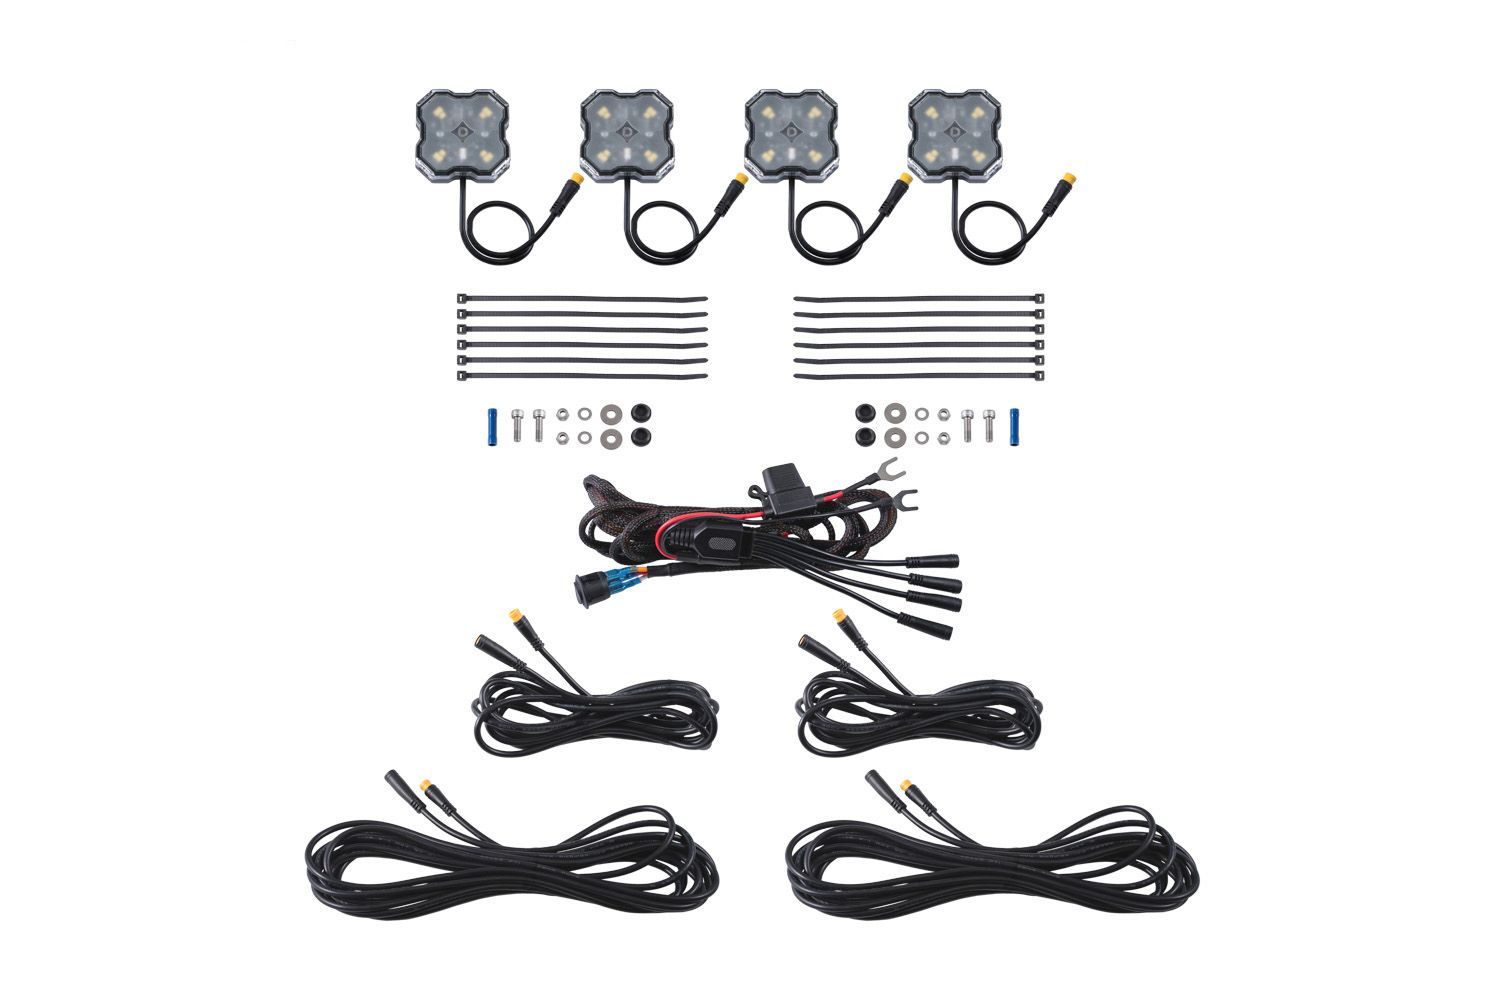
Installation Tools
Mounting Video
If you purchased a mounting adapter, check out the video below. Keep reading for standard mounting and wiring instructions!
NOTE: If you are installing dual-color rock lights, the standard mounting process is the same as our single-color and RGBW rock lights. Dual-color rock lights also work with our interchangeable lenses and compatible mounting accessories.
Mounting Instructions
Step 1 - Identify Mounting Location
Identify the location you would like to mount your Stage Series Rock Lights.
Step 2 - Prepare Rock Light for Mounting
Remove the outer lens from your rock light, then remove the center rubber dust seal.
NOTE: Rock light lenses are interchangeable. If you are installing a dual-color White/Red kit, amber lenses may also be used. The red output will still shine through the amber lens as red, giving you an amber/red setup from the same kit.
Step 3 - Drill Mounting Hole
To mount the rock light using the center hole option, drill a hole using a 7/32" or 15/64" bit in your desired location.
Step 4 - Drill Wire Hole
If you would like to hide the wiring, line up the light over the hole you just drilled and drill an additional 3/8" hole in the appropriate location to run the wire through your mounting surface. Otherwise, pull the wiring to the side.
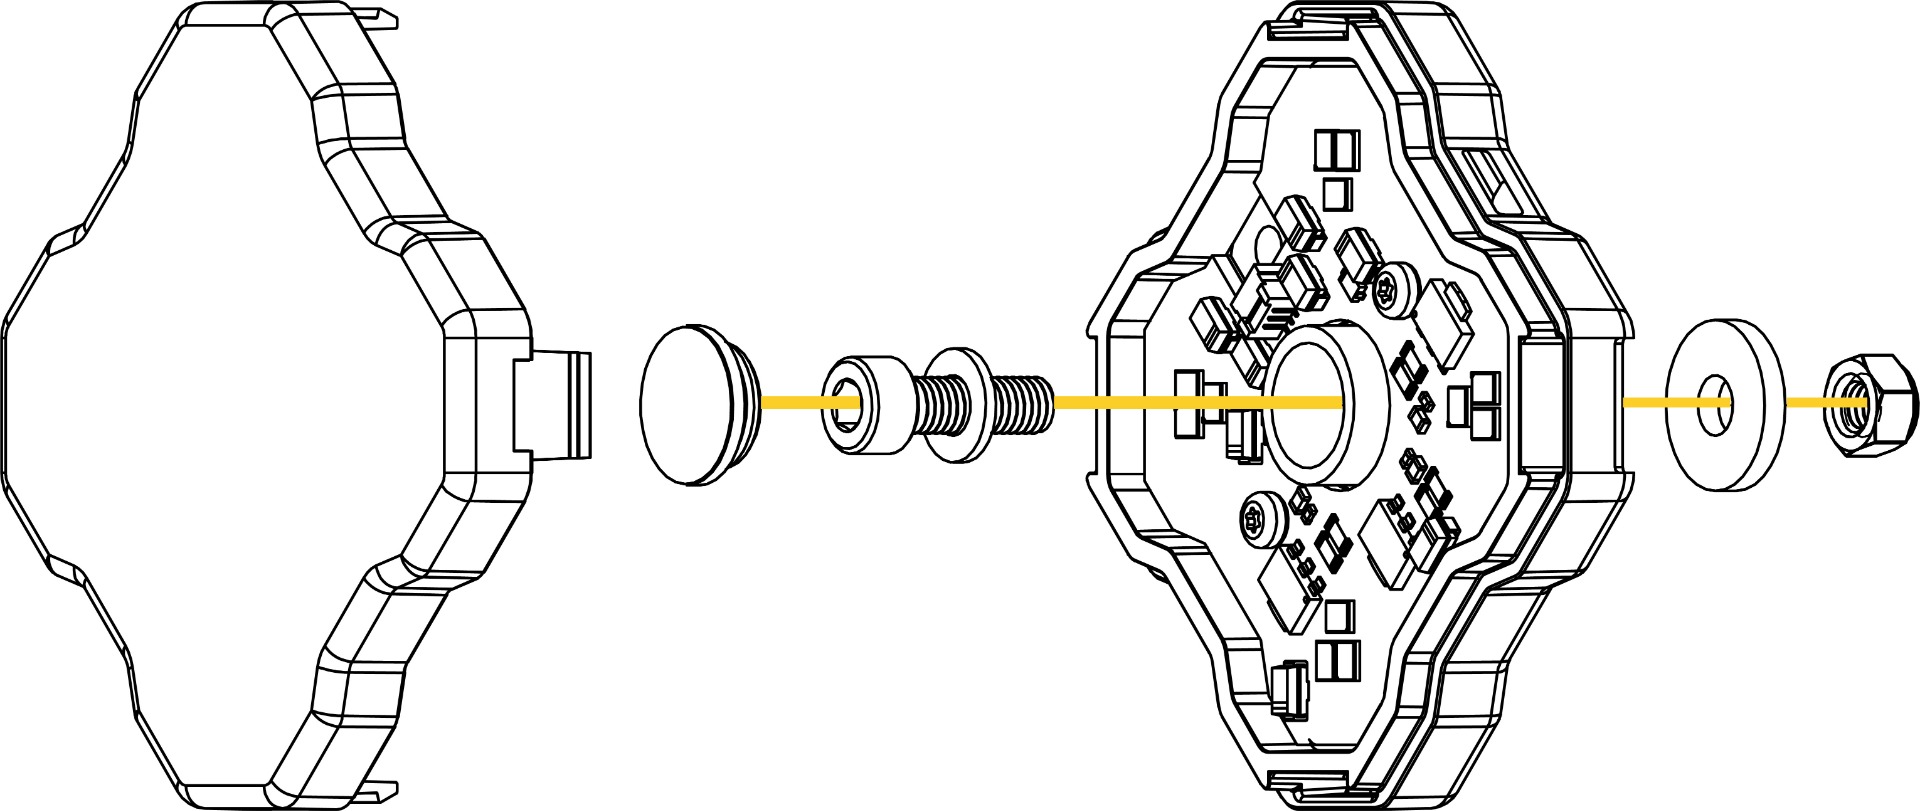
Step 5 - Mount Rock Light
Use the included nut, bolt, and washers to mount the light as shown in the diagram below.
Step 6 - Mount with Zip Ties (Optional)
You may alternatively use zip ties for mounting the rock light to any available attachment point, with integrated tabs on each side of the light.
Step 7 - Reassemble Rock Light
Reinstall the rubber dust seal and clip the lens into position.
Wiring Instructions
NOTE: Dual-color rock lights use the same 3-wire setup as our single-color rock lights. That means they can be installed using the same general wiring process shown below, with one wire for white, one wire for the secondary color, and one ground. If you already have Stage Series single-color rock lights installed, dual-color rock lights can plug into that existing 3-wire setup for a simple upgrade.
Step 8 - Route Switch Wiring
Determine a suitable location to mount the switch, near the battery or main power terminal. Route the switch wiring to that location. Single-color and dual-color rock light kits use a 3-wire switch setup. RGBW kits use the included RGBW controller and wiring.
Step 9 - Connect to Battery
Connect the red power input wire to the positive battery/power terminal. Connect the black ground wire to the negative battery terminal or a factory grounding point.
Step 10 - Select Switch Location
Determine a suitable location to mount the switch in the cabin of the vehicle.
Route the switch wiring to that location. This may require going through the vehicle firewall. We recommend following the path of the factory wiring harness, and unplugging the switch while routing the wires.
Step 11 - Mount the Switch
Drill a 3/4" hole and mount the switch. Reconnect wires to switch.
NOTE: The gold spade on the switch should be connected to the black (ground) wire.
Step 12 - Route the Extension Wires
Identify the extension and splitter wires (included with 8-pack kits) included in your kit. Depending on the kit you ordered, you will have 3M and 5M extension wires. Route the extension wires to each LED, avoiding any moving parts or direct contact with heat sources. Following the factory wire loom is the best practice.
Tip: When disconnecting M8 connectors, grip both sides of the connector housing as close to the connection point as possible. Pulling from the wire or with hands spaced far apart can put excess strain on the internal wiring and may cause damage. The connector should separate with steady, even pressure when held near the housing.
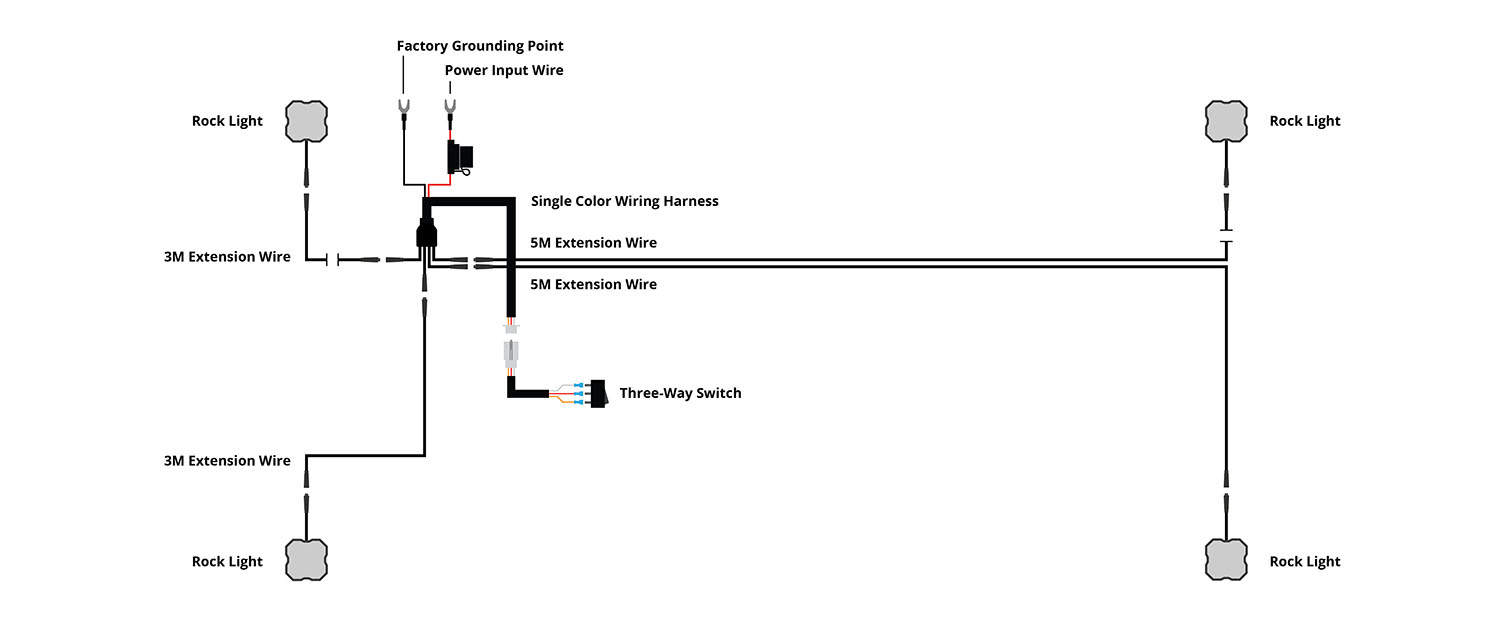
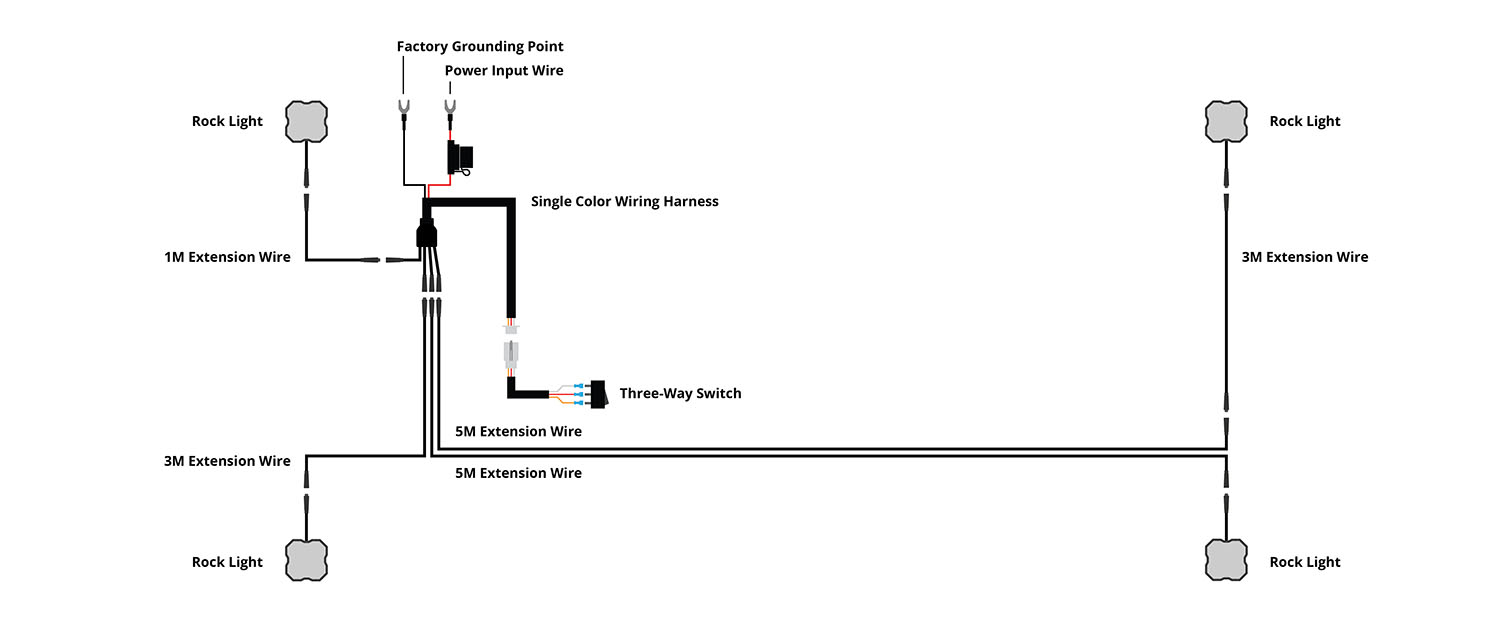
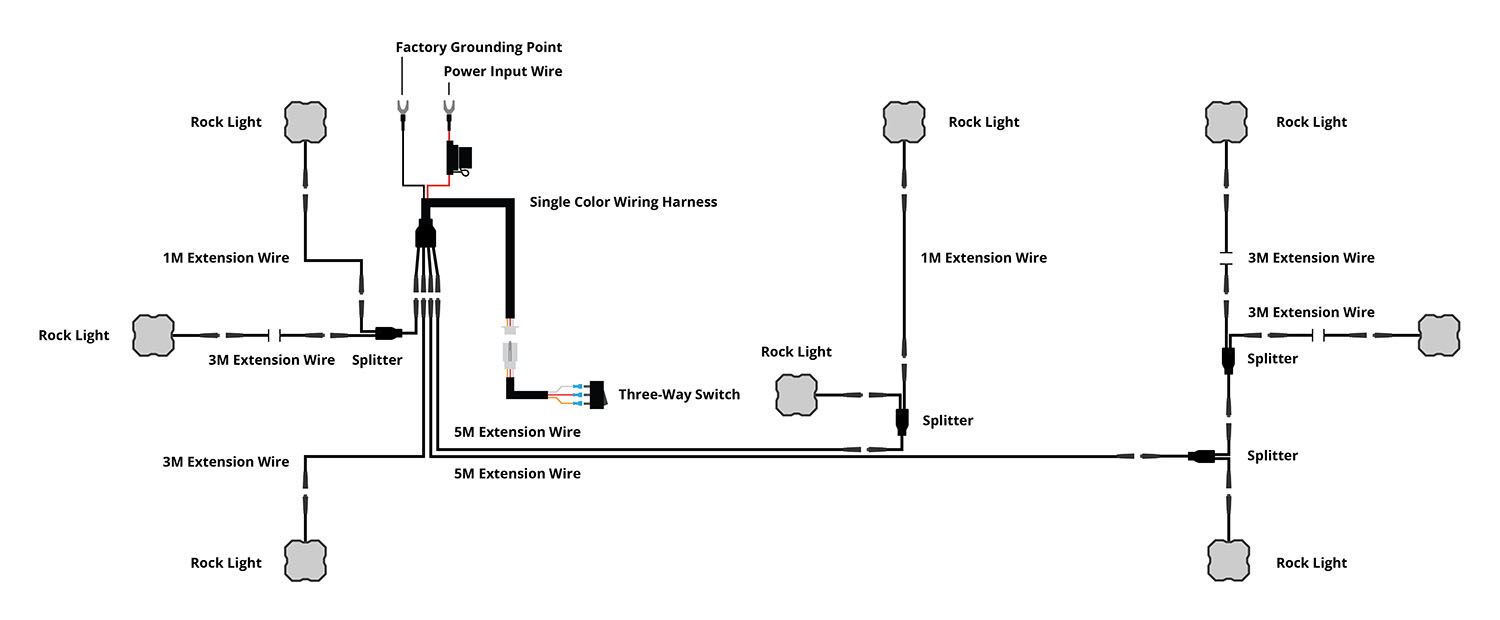
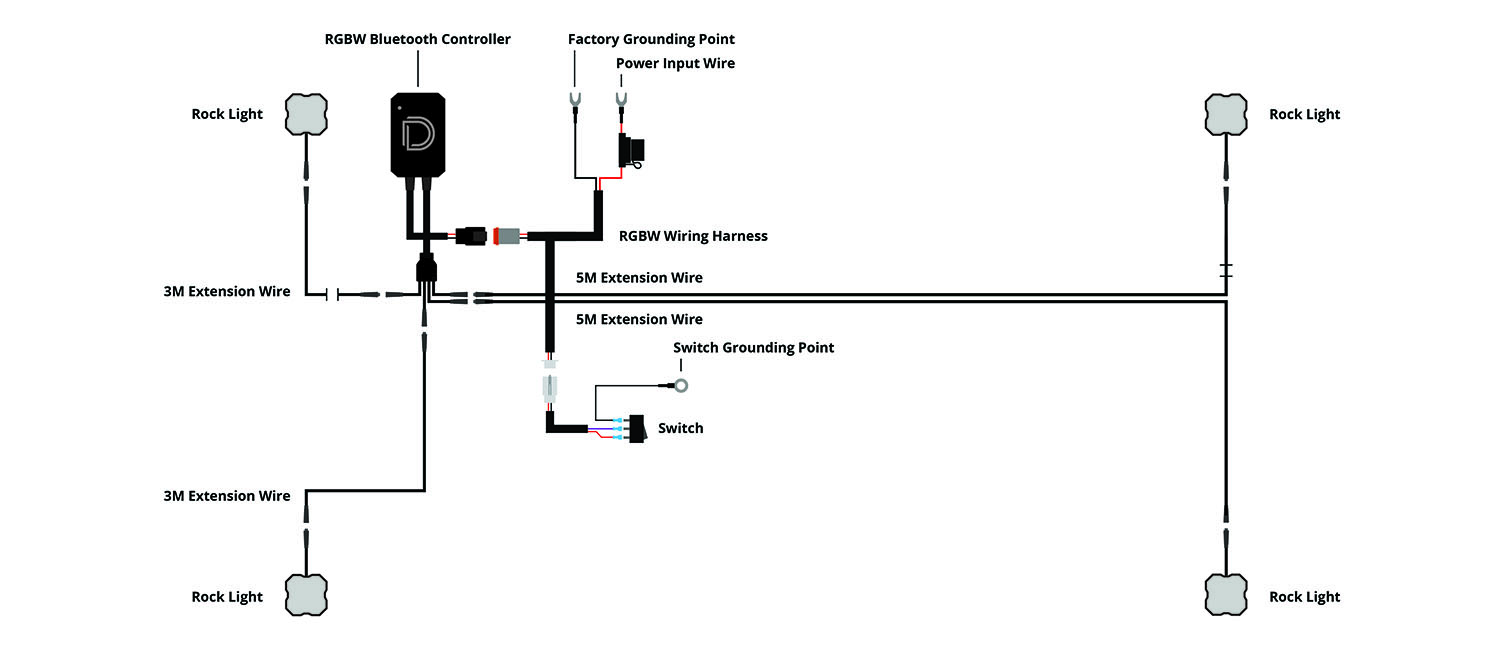
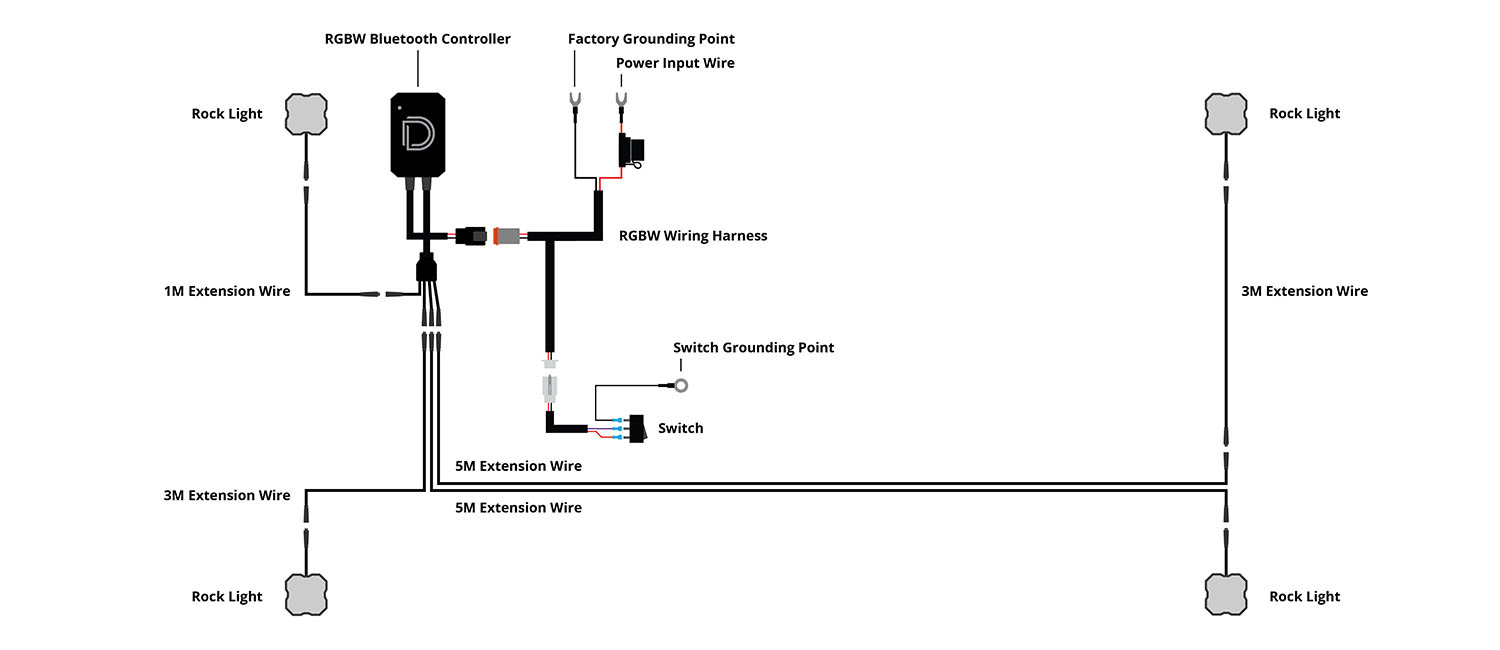
See the diagrams below for the most common way to wire the kit. Plug the output connector into the LED.
NOTE: Dual-color rock lights follow the same wiring layout as the single-color diagrams below. Instead of low and high power, the two switched outputs control white and the secondary color.
Rock Light Single Color Wiring Diagram - 4 Pack
Rock Light Single Color Wiring Diagram - 4 Pack + 1M Extension
Rock Light Single Color Wiring Diagram - 4 Pack + 2 Pack Add-On
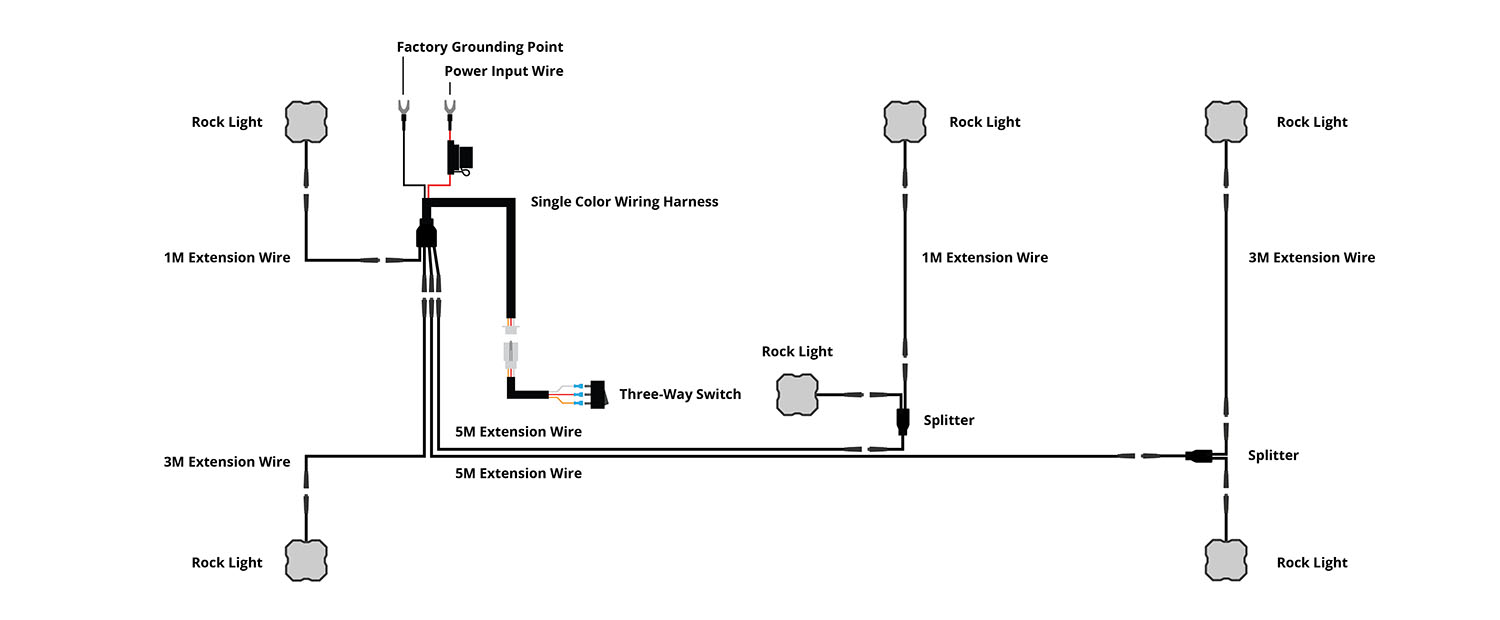
Rock Light Single Color Wiring Diagram - 8 Pack
Rock Light RGBW Wiring Diagram - 4 Pack
Rock Light RGBW Wiring Diagram - 4 Pack + 1M Extension
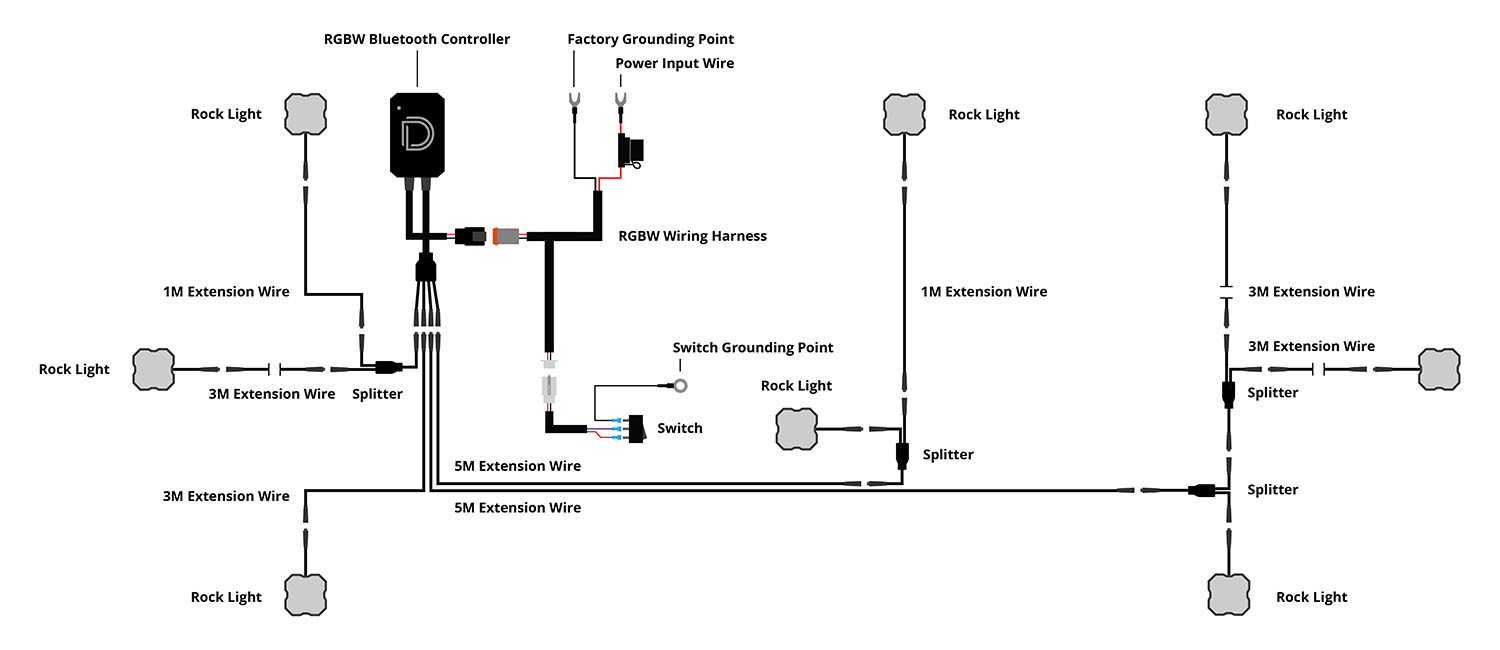
Rock Light RGBW Wiring Diagram - 4 Pack + 2 Pack Add-On
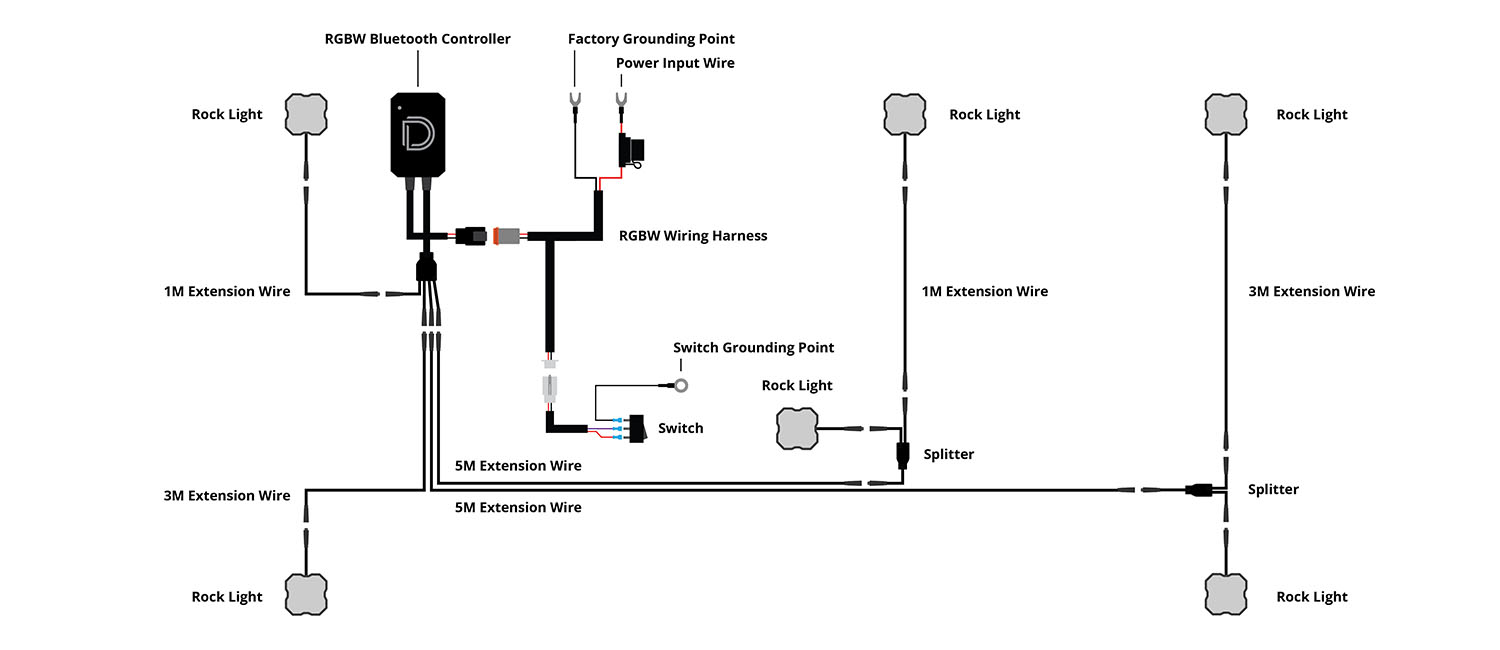
Rock Light RGBW Wiring Diagram - 8 Pack
Step 13 - Reconnect Battery
Reconnect the negative battery terminal, test thoroughly, and aim the LED appropriately based on use. Secure any excess or loose wiring. Please check your local laws and regulations regarding aiming, installation, and restrictions for on-road use, as applicable.
Questions About the Installation?
If you have any questions or issues installing the Stage Series Rock Light Kit, please contact us for further assistance.
Where Can I Buy Stage Series Rock Lights?
If you're ready to upgrade your vehicle with Stage Series Rock Lights, including single-color, dual-color, and RGBW options, click here or use our dealer locator to find a dealer near you.
Want to know more about Diode Dynamics products? Visit DiodeDynamics.com and subscribe to our newsletter for new product releases and more!
This Installation Guide is for the following SKUs: DD7429, DD7430, DD7431, DD7432, DD7433, DD7435, DD7436, DD7437, DD7438, DD7439, DD7440, DD7442, DD7443, DD7444, DD7445, DD7446, DD7447, DD7449, DD7450, DD7451, DD7452, DD7453, DD7454, DD7456, DD7457, DD7458, DD7459, DD7460, DD7461, DD7462, DD7463, DD7464, DD7465, DD7466, DD7467, DD7468, DD7469, DD7470, DD7471, DD7472, DD7473, DD7474, DD7475, DD8742, DD8750, DD8752, DD8753, DD8744, DD8746, DD8748, DD8757, DD8760, DD8743, DD8745, DD8749, DD8755, DD8758, DD8747, DD8754, DD8756, DD8759, DD8788, DD8909
Share This Post